Brief Intro
This page outlines the basics of WebUSB, and how I set it up and tested for basic functionality. It also outlines my conclusion, which was presented on the Architecture page.
WebUSB is an API that allows certain compatible microcontrollers to be able to communicate to a web browser. This would open up the potential for users to be able to interact with the Arduino using an HTML file.
This relates to the project, as it is possible to be able to have a videofeed and have the user see what is going on and allow for a bit of manual control.
This guide has some demos as well as code that can be ran to ensure that WebUSB is working as expected. The following is an adapted version of the tutorials presented in this video. For more information about the code and details about WebUSB, watch the linked video.
Demos
- USB Recognition
- Microcontroller to Web Browser Communication
- Web Browser to Microcontroller Communication
USB Recognition
The goal of this demo is to create a basic website that will allow the user to plug in a USB device and obtain important details to the console. This demo does not require the use of the WebUSB library, and no code needs to be uploaded to the microcontroller. This means that ANY device, regardless of whether it supports WebUSB or not, can run this test successfully, as this relies on the browser picking up the fact that a USB was plugged in rather than communicating with it.
| USB_recog.html |
|---|
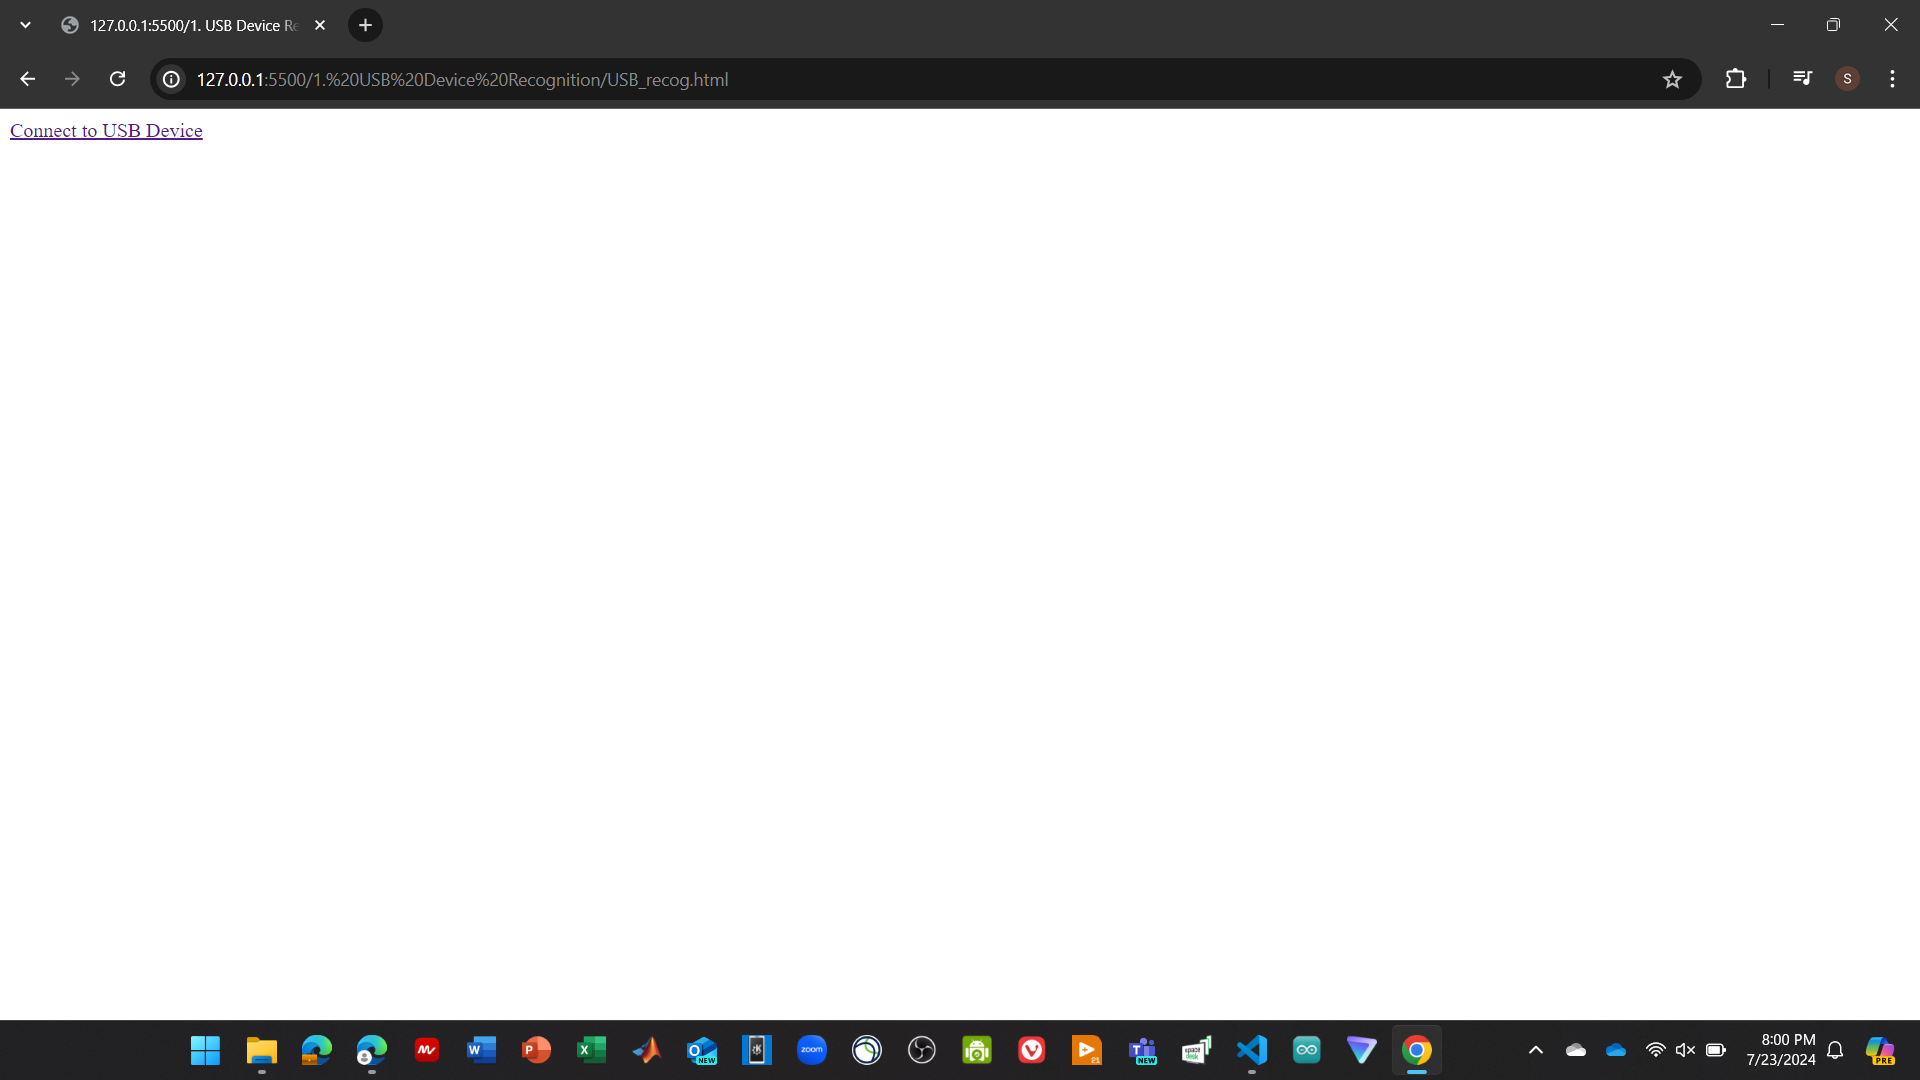
| <a href="#" id="click">Connect to USB Device</a>
<script>
click.onclick = function() {
navigator.usb.requestDevice( {filters: [
{'vendorId': 0x2341}
]})
.then(device => {
console.log(device)
console.log("Product Name: " + device.productName.toString(16))
console.log("Product ID: " + device.productId.toString(16))
console.log("Vendor ID: "+ device.vendorId.toString(16))
})
.catch(error => {
console.log(error)
})
}
</script>
|
Images below show output of html code and how it works when an Arduino Leonardo is connected:
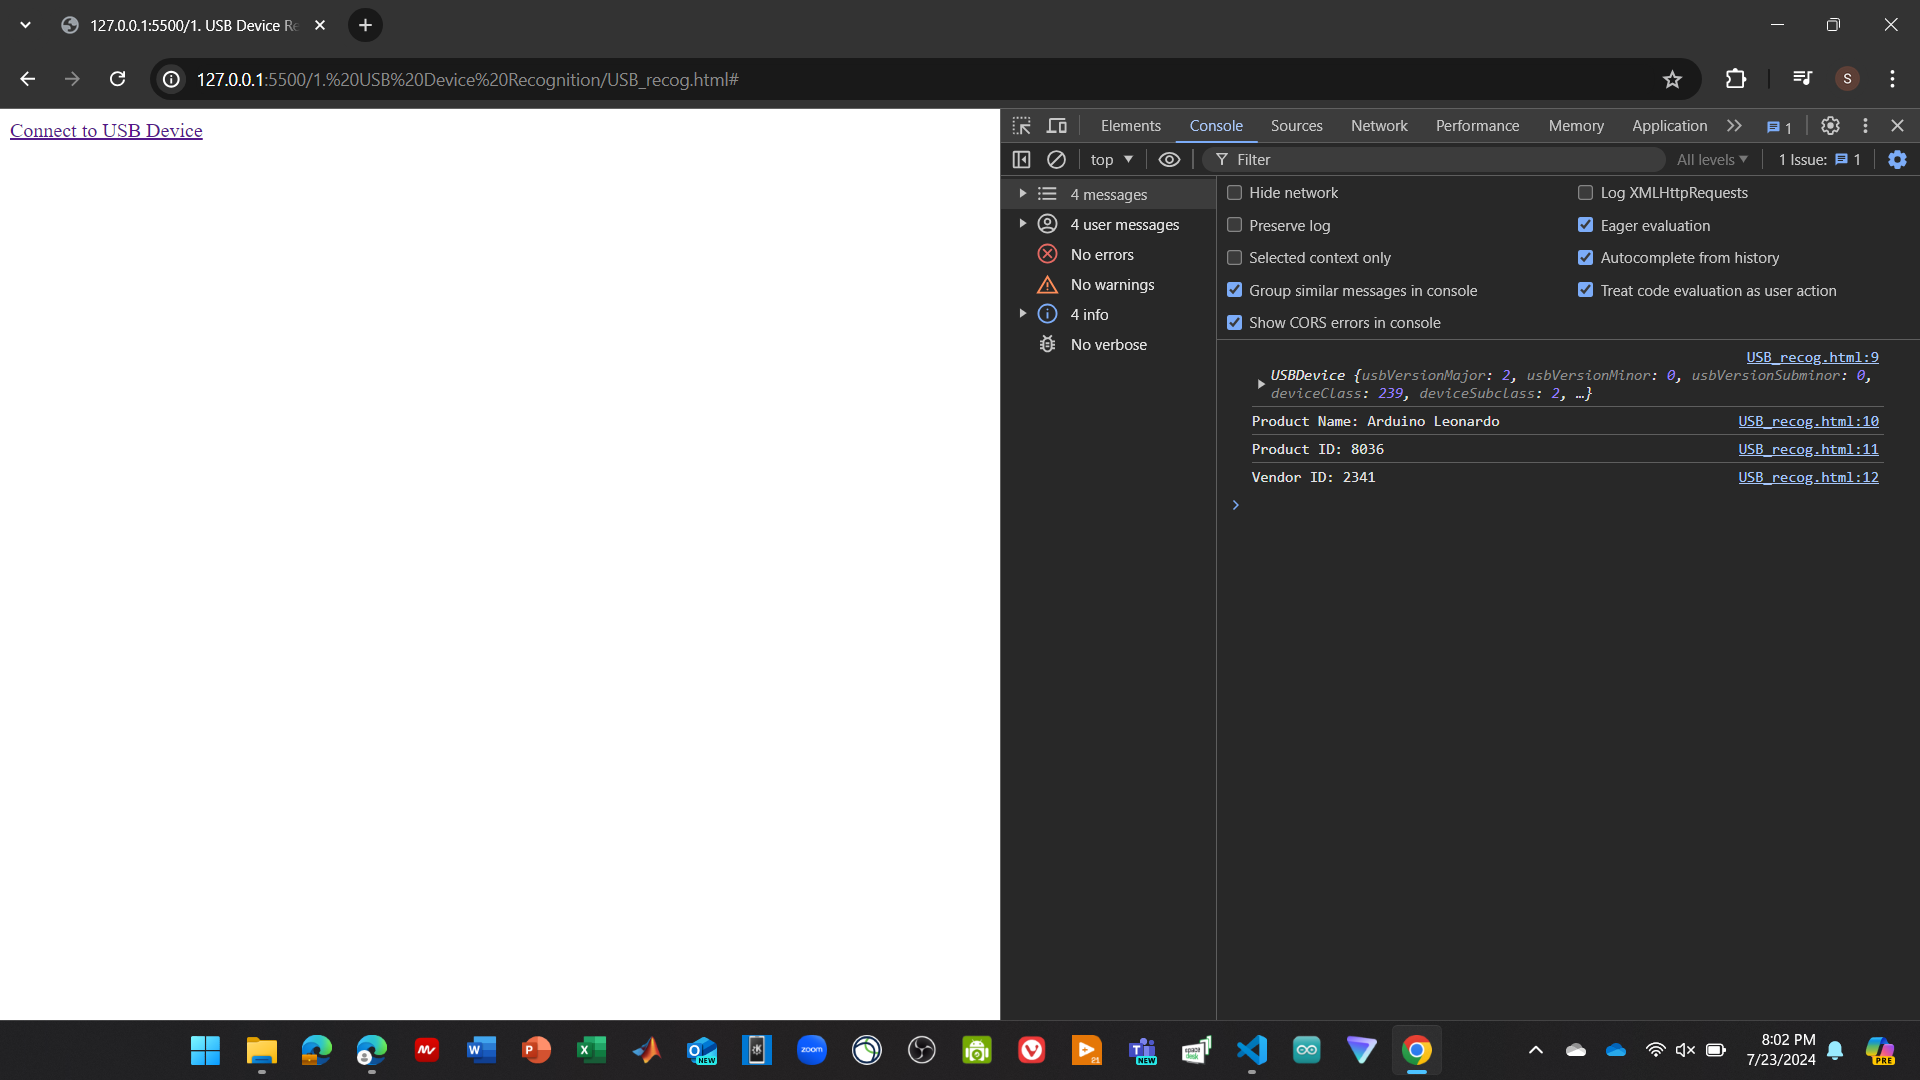
Note that no code is needed for the Arduino.
Microcontroller to Web Browser Communication
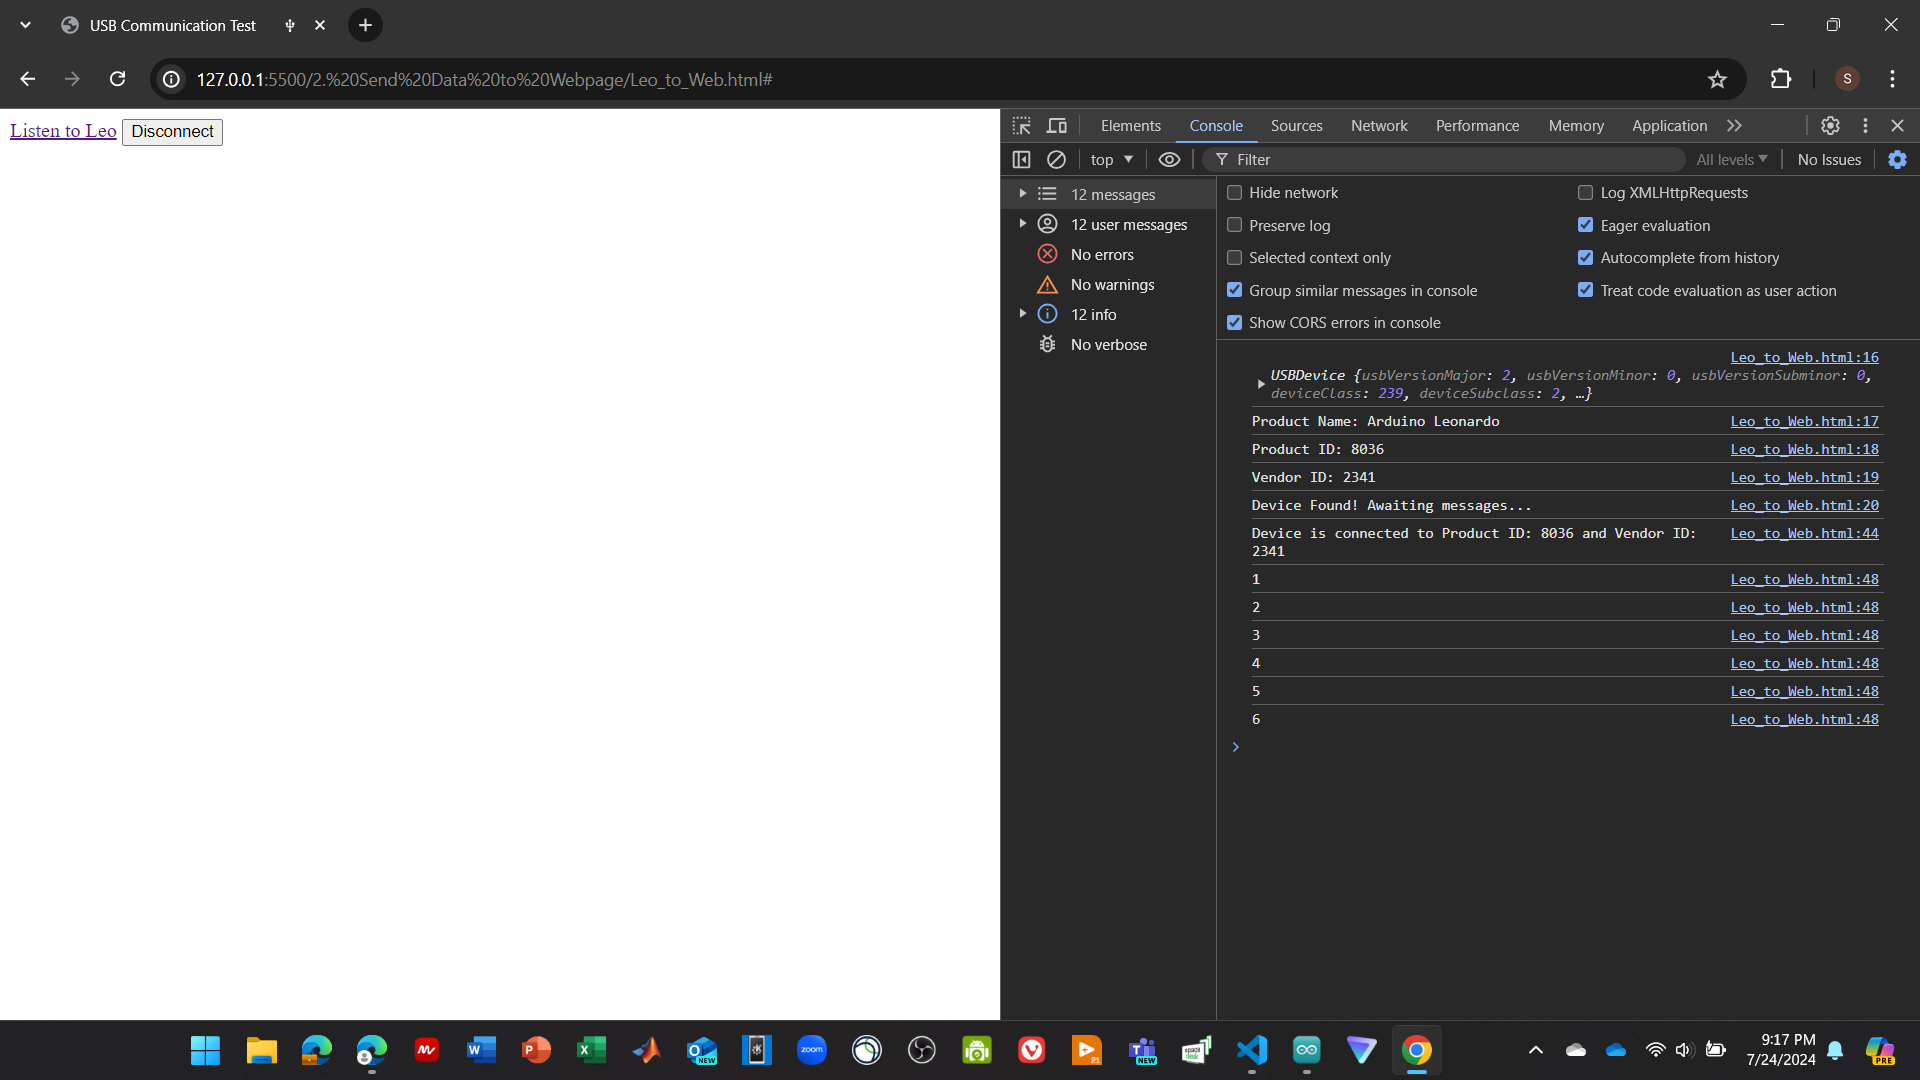
The goal of this demo is to be able to send data from the microcontroller and the website. While this demo will work in this particular way, it sets up the backbone for establishing a 2 way communication between the microcontroller and the website.
HTML Code:
| Leo_to_Web.html |
|---|
| <!DOCTYPE html>
<html>
<head>
<title>USB Communication Test</title>
</head>
<body>
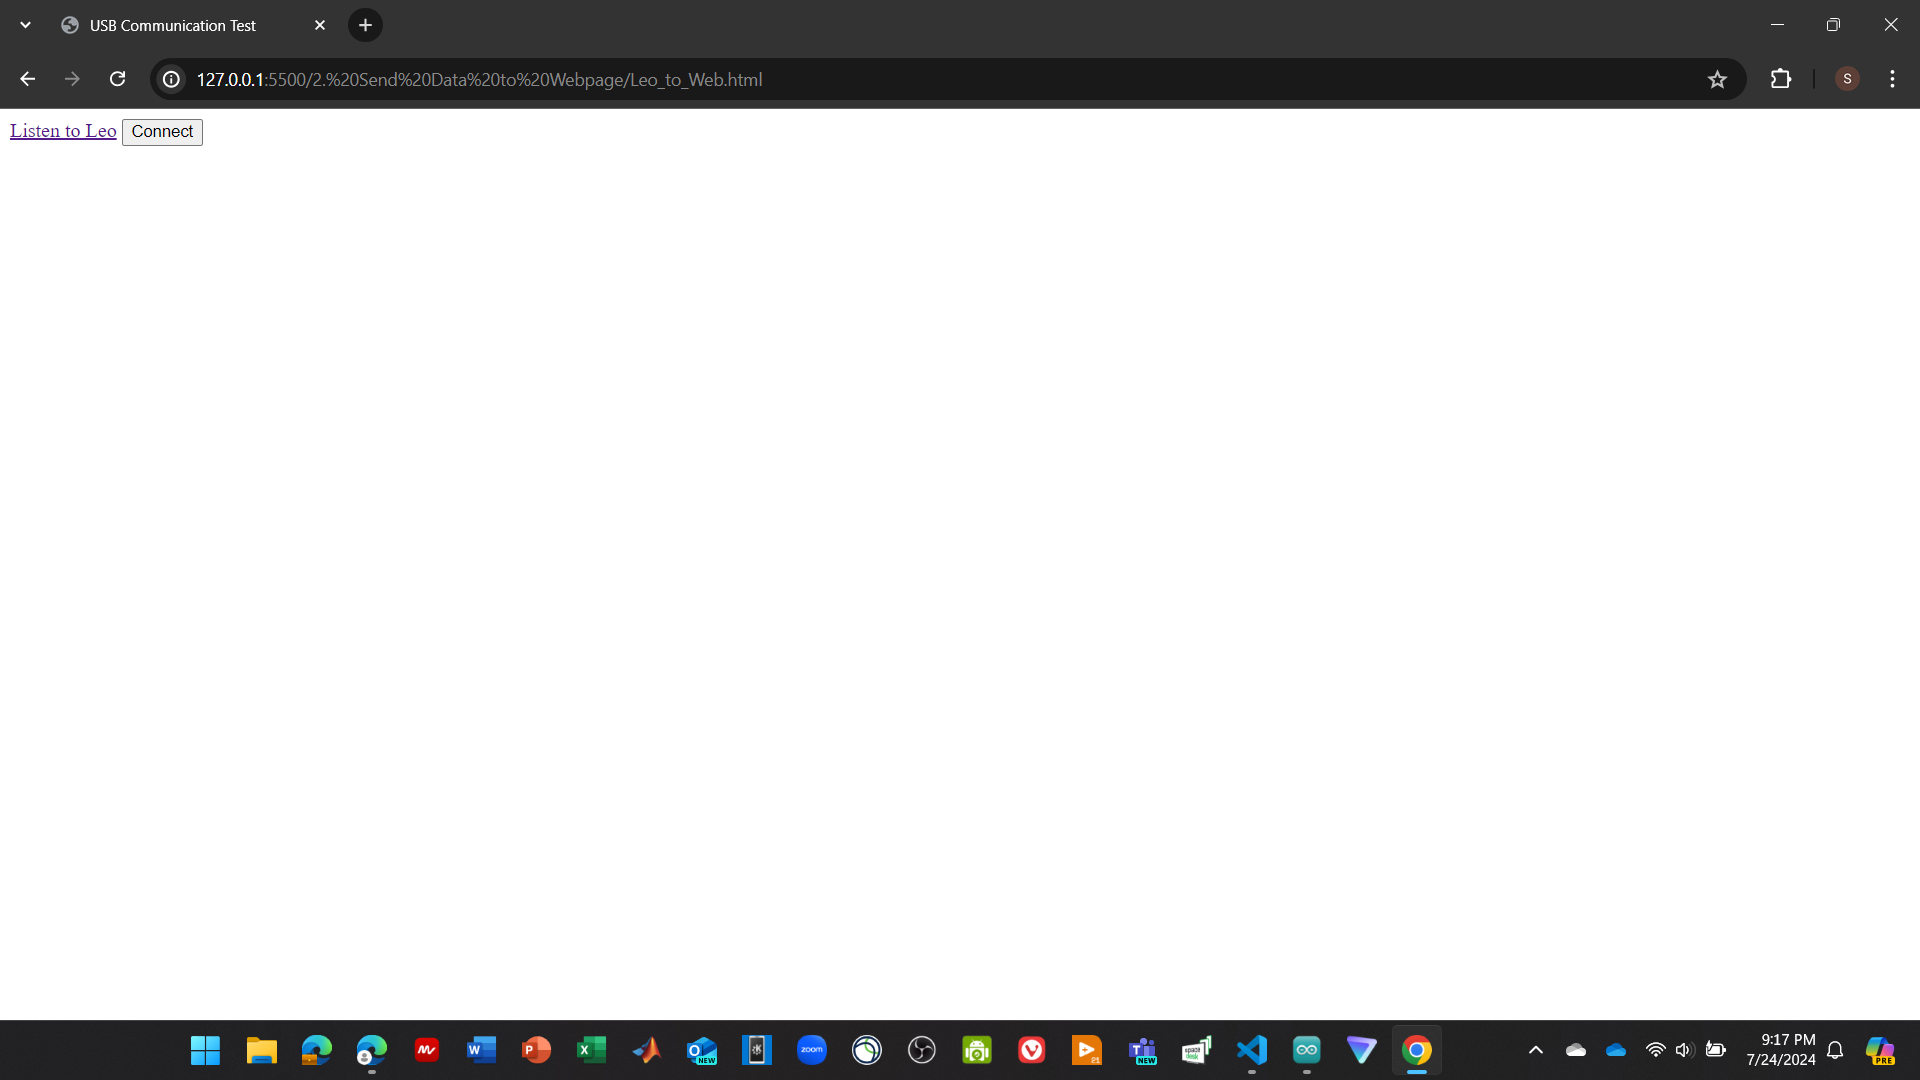
<a href="#" id="click">Listen to Leo</a>
<button id="connect">Connect</button>
<script src="serial.js"></script>
<script>
document.getElementById('click').onclick = function() {
navigator.usb.requestDevice({ filters: [{ 'vendorId': 0x2341 }] })
.then(device => {
console.log(device);
console.log("Product Name: " + device.productName);
console.log("Product ID: " + device.productId.toString(16));
console.log("Vendor ID: " + device.vendorId.toString(16));
console.log("Device Found! Awaiting messages...");
})
.catch(error => {
console.log(error);
});
};
var port;
var connectButton = document.getElementById('connect');
var textDecoder = new TextDecoder();
var textEncoder = new TextEncoder();
connectButton.addEventListener('click', function() {
if (port) {
// If port is already connected, disconnect it
connectButton.textContent = 'Connect';
port.disconnect();
port = null;
console.log('Device is disconnected.');
} else {
// If there is no port, then connect to a new port
serial.requestPort().then(selectedPort => {
port = selectedPort;
port.connect().then(() => {
console.log('Device is connected to Product ID: ' + port.device_.productId.toString(16) + ' and Vendor ID: ' + port.device_.vendorId.toString(16));
connectButton.textContent = 'Disconnect';
port.onReceive = data => {
console.log(textDecoder.decode(data));
};
port.onReceiveError = error => {
console.log('Receive error: ' + error);
};
}, error => {
console.log('Connection error: ' + error);
});
}).catch(error => {
console.log('Connection error: ' + error);
});
}
});
serial.requestPort = function() {
const filters = [
{ 'vendorId': 0x2341 }
];
return navigator.usb.requestDevice({ 'filters': filters }).then(
device => new serial.Port(device)
);
};
</script>
</body>
</html>
|
Arduino Code:
| Leo2.ino |
|---|
| #include <WebUSB.h>
// Modified from example https://webusb.github.io/arduino/demos/console
WebUSB WebUSBSerial(1, "webusb.github.io/arduino/demos/console");
int c = 0;
void setup() {
WebUSBSerial.begin(9600);
while (!WebUSBSerial) {}
delay(100);
}
void loop() {
c = c + 1;
if (WebUSBSerial){
WebUSBSerial.println(c);
WebUSBSerial.flush();
} else {
c = 0;
}
delay(1000);
}
|
Serial.js code:
| serial.js |
|---|
| var serial = {};
(function() {
'use strict';
serial.getPorts = function() {
return navigator.usb.getDevices().then(devices => {
return devices.map(device => new serial.Port(device));
});
};
serial.requestPort = function() {
const filters = [
{ 'vendorId': 0x2341, 'productId': 0x8036 }, // Arduino Leonardo
{ 'vendorId': 0x2341, 'productId': 0x8037 }, // Arduino Micro
{ 'vendorId': 0x2341, 'productId': 0x804d }, // Arduino/Genuino Zero
{ 'vendorId': 0x2341, 'productId': 0x804e }, // Arduino/Genuino MKR1000
{ 'vendorId': 0x2341, 'productId': 0x804f }, // Arduino MKRZERO
{ 'vendorId': 0x2341, 'productId': 0x8050 }, // Arduino MKR FOX 1200
{ 'vendorId': 0x2341, 'productId': 0x8052 }, // Arduino MKR GSM 1400
{ 'vendorId': 0x2341, 'productId': 0x8053 }, // Arduino MKR WAN 1300
{ 'vendorId': 0x2341, 'productId': 0x8054 }, // Arduino MKR WiFi 1010
{ 'vendorId': 0x2341, 'productId': 0x8055 }, // Arduino MKR NB 1500
{ 'vendorId': 0x2341, 'productId': 0x8056 }, // Arduino MKR Vidor 4000
{ 'vendorId': 0x2341, 'productId': 0x8057 }, // Arduino NANO 33 IoT
{ 'vendorId': 0x239A }, // Adafruit Boards!
];
return navigator.usb.requestDevice({ 'filters': filters }).then(
device => new serial.Port(device)
);
}
serial.Port = function(device) {
this.device_ = device;
this.interfaceNumber_ = 2; // original interface number of WebUSB Arduino demo
this.endpointIn_ = 5; // original in endpoint ID of WebUSB Arduino demo
this.endpointOut_ = 4; // original out endpoint ID of WebUSB Arduino demo
};
serial.Port.prototype.connect = function() {
let readLoop = () => {
this.device_.transferIn(this.endpointIn_, 64).then(result => {
this.onReceive(result.data);
readLoop();
}, error => {
this.onReceiveError(error);
});
};
return this.device_.open()
.then(() => {
if (this.device_.configuration === null) {
return this.device_.selectConfiguration(1);
}
})
.then(() => {
var configurationInterfaces = this.device_.configuration.interfaces;
configurationInterfaces.forEach(element => {
element.alternates.forEach(elementalt => {
if (elementalt.interfaceClass==0xff) {
this.interfaceNumber_ = element.interfaceNumber;
elementalt.endpoints.forEach(elementendpoint => {
if (elementendpoint.direction == "out") {
this.endpointOut_ = elementendpoint.endpointNumber;
}
if (elementendpoint.direction=="in") {
this.endpointIn_ =elementendpoint.endpointNumber;
}
})
}
})
})
})
.then(() => this.device_.claimInterface(this.interfaceNumber_))
.then(() => this.device_.selectAlternateInterface(this.interfaceNumber_, 0))
// The vendor-specific interface provided by a device using this
// Arduino library is a copy of the normal Arduino USB CDC-ACM
// interface implementation and so reuses some requests defined by
// that specification. This request sets the DTR (data terminal
// ready) signal high to indicate to the device that the host is
// ready to send and receive data.
.then(() => this.device_.controlTransferOut({
'requestType': 'class',
'recipient': 'interface',
'request': 0x22,
'value': 0x01,
'index': this.interfaceNumber_}))
.then(() => {
readLoop();
});
};
serial.Port.prototype.disconnect = function() {
// This request sets the DTR (data terminal ready) signal low to
// indicate to the device that the host has disconnected.
return this.device_.controlTransferOut({
'requestType': 'class',
'recipient': 'interface',
'request': 0x22,
'value': 0x00,
'index': this.interfaceNumber_})
.then(() => this.device_.close());
};
serial.Port.prototype.send = function(data) {
return this.device_.transferOut(this.endpointOut_, data);
};
})();
|
Images below show output and how it works when an Arduino Leonardo is connected:
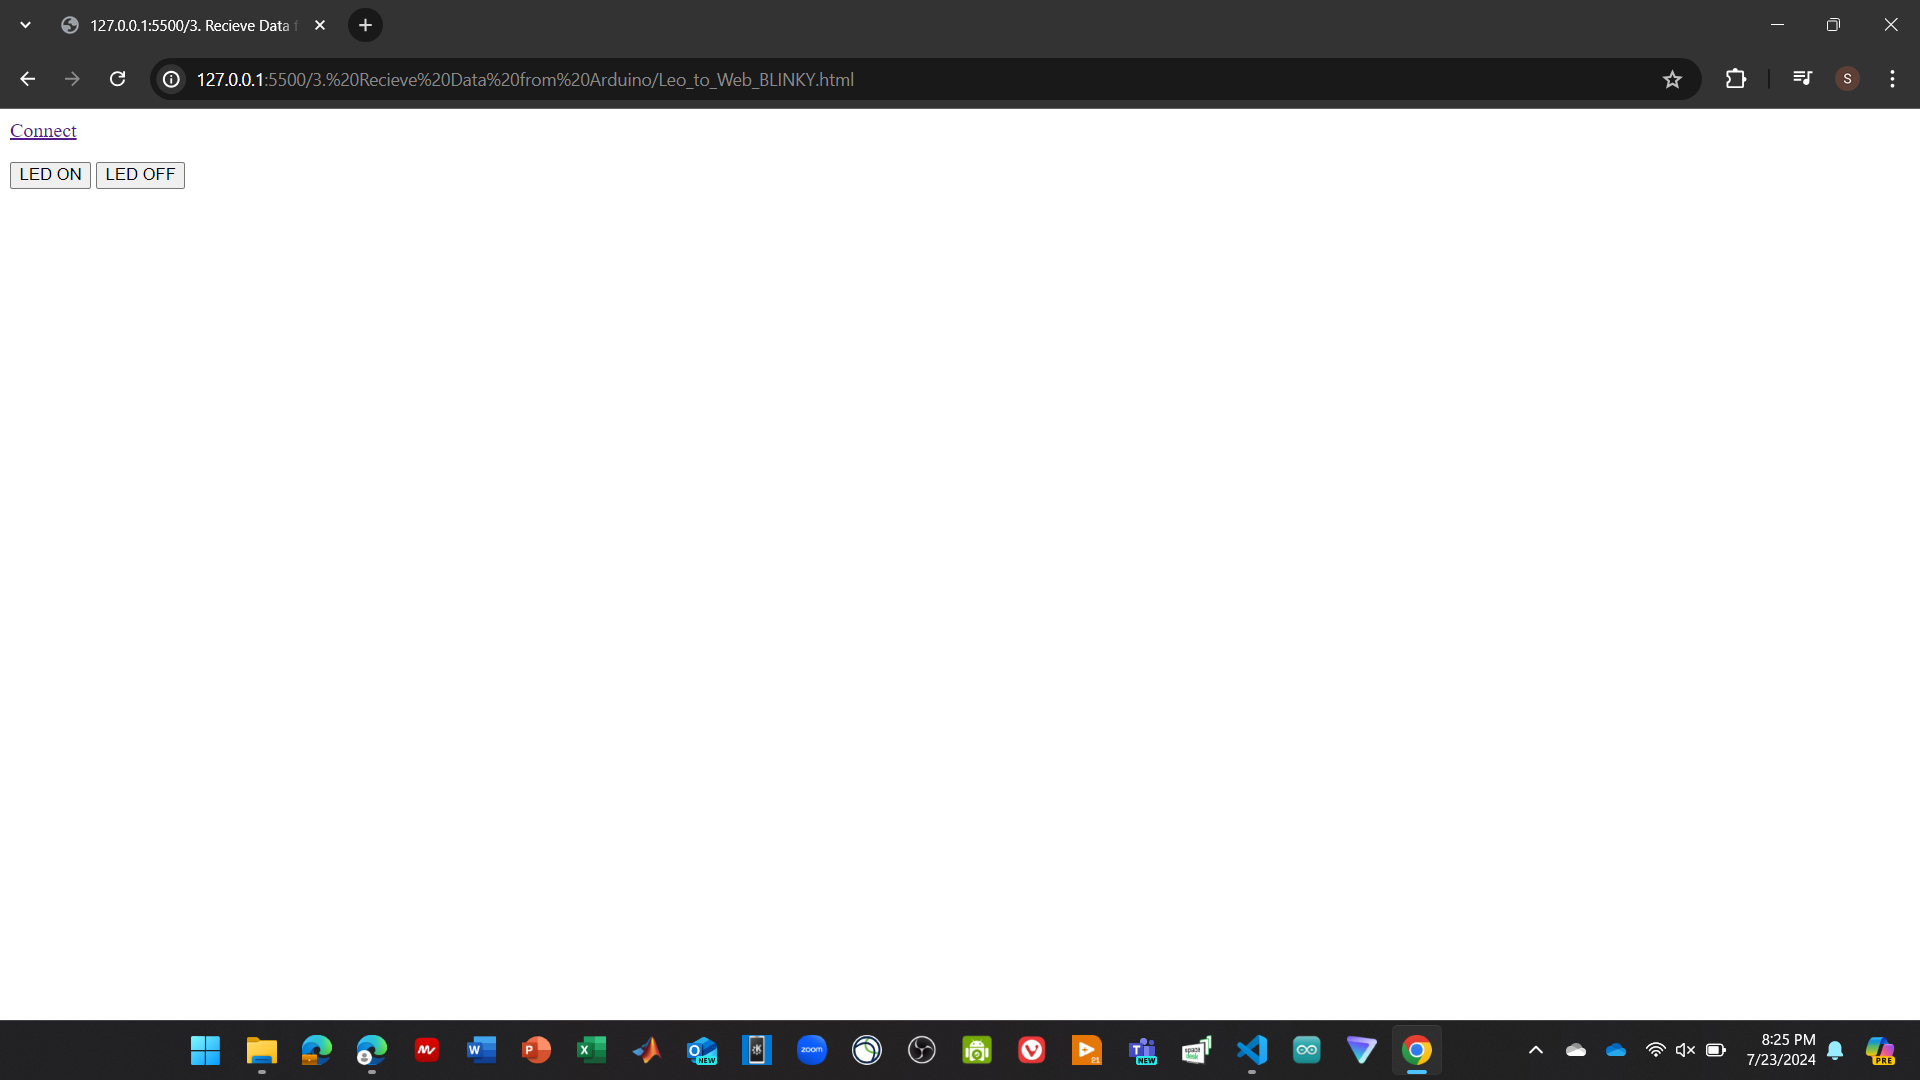
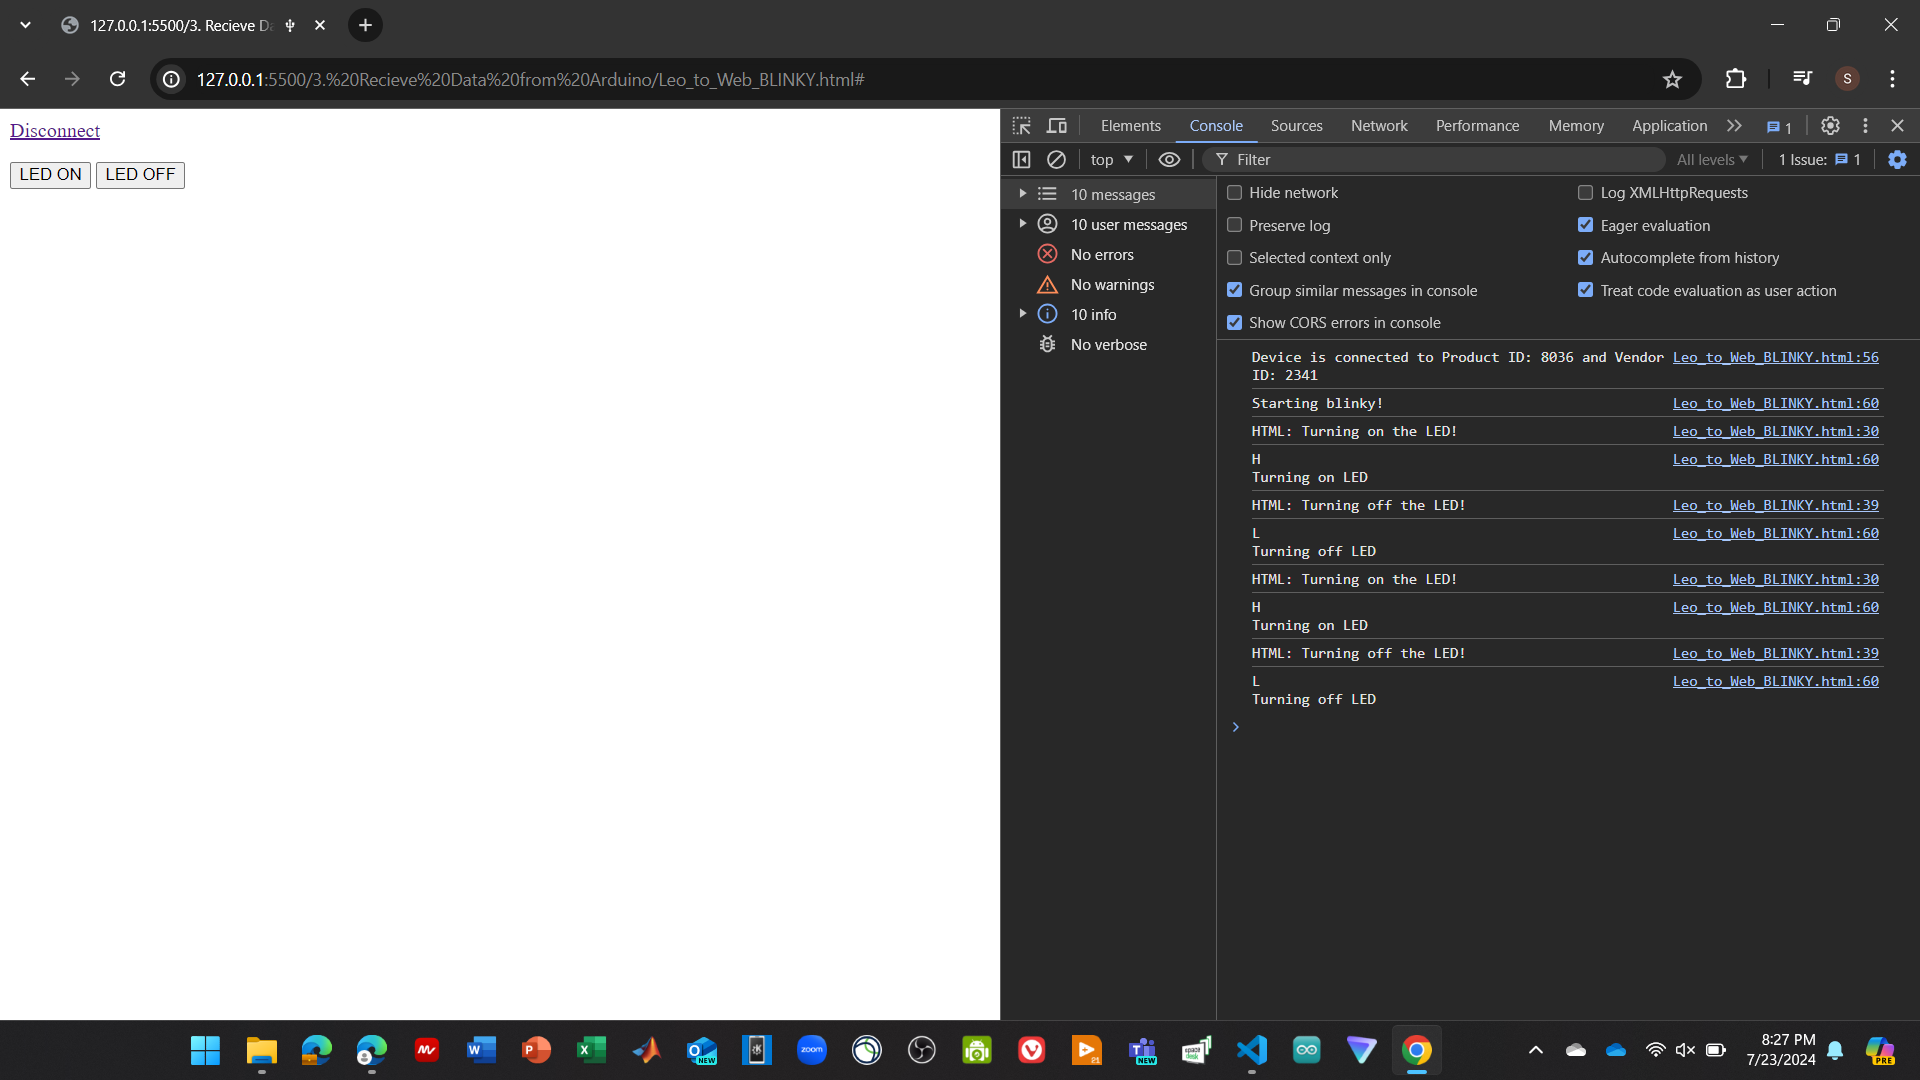
Web Browser to Microcontroller Communication → Blinky
The goal of this demo is to be able to control a microcontroller by having the user interface with a website. For the project, it would open up many possibilities for human interaction as the sorter is working through sorting. As of today, the only thing that makes sense would be to have a manual override in case something goes wrong, and maybe a stop and start function. An HTML would also be able to display possible metrics that are coming in from the microcontroller. This would include how many items were sorted, a running count of each type of item sorted, etc. Metrics are something that I would consider desirable and not required. The biggest use case of the website would be to train the ML model that would be used to then sort. This would be something very similar to what is implemented on Teachable Machine by Google.
This demo uses an Arduino Leonardo and an HTML file to turn on and off the builtin LED.
HTML Code:
| Leo_to_Web_BLINKY.html |
|---|
| <a href="#" id="connect">Connect</a>
<p>
<button id="on">LED ON</button>
<button id="off">LED OFF</button>
</p>
<script src="serial.js"></script>
<script>
serial.requestPort = function() {
const filters = [
{'vendorId': 0x2341}
];
return navigator.usb.requestDevice({'filters': filters}).then(
device => new serial.Port(device)
);
}
var port;
var connectButton = document.getElementById('connect');
var textDecoder = new TextDecoder();
var textEncoder = new TextEncoder();
document.querySelector('#on').addEventListener('click', function() {
if (port !== undefined) {
port.send(textEncoder.encode('H')).catch(error => {
console.log("Error: " + error)
})
console.log("HTML: Turning on the LED!")
}
})
document.querySelector('#off').addEventListener('click', function() {
if (port !== undefined) {
port.send(textEncoder.encode('L')).catch(error => {
console.log("Error: " + error)
})
console.log("HTML: Turning off the LED!")
}
})
connectButton.addEventListener('click', function() {
if (port) {
// If port is already connected, disconnect it
connectButton.textContent = 'Connect';
port.disconnect();
port = null;
console.log('Device is disconnected.');
} else {
// If there is no port, then connect to a new port
serial.requestPort().then(selectedPort => {
port = selectedPort;
port.connect().then(() => {
console.log('Device is connected to Product ID: ' + port.device_.productId.toString(16) + ' and Vendor ID: ' + port.device_.vendorId.toString(16));
connectButton.textContent = 'Disconnect';
port.onReceive = data => {
console.log(textDecoder.decode(data));
};
port.onReceiveError = error => {
console.log('Receive error: ' + error);
};
}, error => {
console.log('Connection error: ' + error);
});
}).catch(error => {
console.log('Connection error: ' + error);
});
}
});
</script>
|
Arduino Code:
| Blinky.ino |
|---|
| #include <WebUSB.h>
WebUSB WebUSBSerial(1, "webusb.github.io/arduino/demos/console");
const int ledPin = 13;
void setup() {
WebUSBSerial.begin(9600);
while (!WebUSBSerial) {}
delay(100);
SerialUSB.begin(9600);
delay(100);
WebUSBSerial.write("Starting blinky!");
WebUSBSerial.flush();
SerialUSB.println("Starting...");
pinMode(ledPin, OUTPUT);
}
void loop() {
if (WebUSBSerial && WebUSBSerial.available()) {
char byte = WebUSBSerial.read(); // Read the incoming byte as a character
WebUSBSerial.write(byte); // Echo the received byte
if (byte == 'H') { // Compare the byte with the character 'H'
SerialUSB.println("Received H!");
WebUSBSerial.write("\nTurning on LED");
digitalWrite(ledPin, HIGH); // Turn the LED on
} else if (byte == 'L') { // Compare the byte with the character 'L'
SerialUSB.println("Received L!");
WebUSBSerial.write("\nTurning off LED");
digitalWrite(ledPin, LOW); // Turn the LED off
}
WebUSBSerial.flush();
}
}
|
Serial.js code (same as before, provided for reference):
| serial.js |
|---|
| var serial = {};
(function() {
'use strict';
serial.getPorts = function() {
return navigator.usb.getDevices().then(devices => {
return devices.map(device => new serial.Port(device));
});
};
serial.requestPort = function() {
const filters = [
{ 'vendorId': 0x2341, 'productId': 0x8036 }, // Arduino Leonardo
{ 'vendorId': 0x2341, 'productId': 0x8037 }, // Arduino Micro
{ 'vendorId': 0x2341, 'productId': 0x804d }, // Arduino/Genuino Zero
{ 'vendorId': 0x2341, 'productId': 0x804e }, // Arduino/Genuino MKR1000
{ 'vendorId': 0x2341, 'productId': 0x804f }, // Arduino MKRZERO
{ 'vendorId': 0x2341, 'productId': 0x8050 }, // Arduino MKR FOX 1200
{ 'vendorId': 0x2341, 'productId': 0x8052 }, // Arduino MKR GSM 1400
{ 'vendorId': 0x2341, 'productId': 0x8053 }, // Arduino MKR WAN 1300
{ 'vendorId': 0x2341, 'productId': 0x8054 }, // Arduino MKR WiFi 1010
{ 'vendorId': 0x2341, 'productId': 0x8055 }, // Arduino MKR NB 1500
{ 'vendorId': 0x2341, 'productId': 0x8056 }, // Arduino MKR Vidor 4000
{ 'vendorId': 0x2341, 'productId': 0x8057 }, // Arduino NANO 33 IoT
{ 'vendorId': 0x239A }, // Adafruit Boards!
];
return navigator.usb.requestDevice({ 'filters': filters }).then(
device => new serial.Port(device)
);
}
serial.Port = function(device) {
this.device_ = device;
this.interfaceNumber_ = 2; // original interface number of WebUSB Arduino demo
this.endpointIn_ = 5; // original in endpoint ID of WebUSB Arduino demo
this.endpointOut_ = 4; // original out endpoint ID of WebUSB Arduino demo
};
serial.Port.prototype.connect = function() {
let readLoop = () => {
this.device_.transferIn(this.endpointIn_, 64).then(result => {
this.onReceive(result.data);
readLoop();
}, error => {
this.onReceiveError(error);
});
};
return this.device_.open()
.then(() => {
if (this.device_.configuration === null) {
return this.device_.selectConfiguration(1);
}
})
.then(() => {
var configurationInterfaces = this.device_.configuration.interfaces;
configurationInterfaces.forEach(element => {
element.alternates.forEach(elementalt => {
if (elementalt.interfaceClass==0xff) {
this.interfaceNumber_ = element.interfaceNumber;
elementalt.endpoints.forEach(elementendpoint => {
if (elementendpoint.direction == "out") {
this.endpointOut_ = elementendpoint.endpointNumber;
}
if (elementendpoint.direction=="in") {
this.endpointIn_ =elementendpoint.endpointNumber;
}
})
}
})
})
})
.then(() => this.device_.claimInterface(this.interfaceNumber_))
.then(() => this.device_.selectAlternateInterface(this.interfaceNumber_, 0))
// The vendor-specific interface provided by a device using this
// Arduino library is a copy of the normal Arduino USB CDC-ACM
// interface implementation and so reuses some requests defined by
// that specification. This request sets the DTR (data terminal
// ready) signal high to indicate to the device that the host is
// ready to send and receive data.
.then(() => this.device_.controlTransferOut({
'requestType': 'class',
'recipient': 'interface',
'request': 0x22,
'value': 0x01,
'index': this.interfaceNumber_}))
.then(() => {
readLoop();
});
};
serial.Port.prototype.disconnect = function() {
// This request sets the DTR (data terminal ready) signal low to
// indicate to the device that the host has disconnected.
return this.device_.controlTransferOut({
'requestType': 'class',
'recipient': 'interface',
'request': 0x22,
'value': 0x00,
'index': this.interfaceNumber_})
.then(() => this.device_.close());
};
serial.Port.prototype.send = function(data) {
return this.device_.transferOut(this.endpointOut_, data);
};
})();
|
Images below show output and how it works:
Software Creation Attempts
This section tracks all attempts to get WebUSB working to integrate nicely with a webcam and an Arduino.
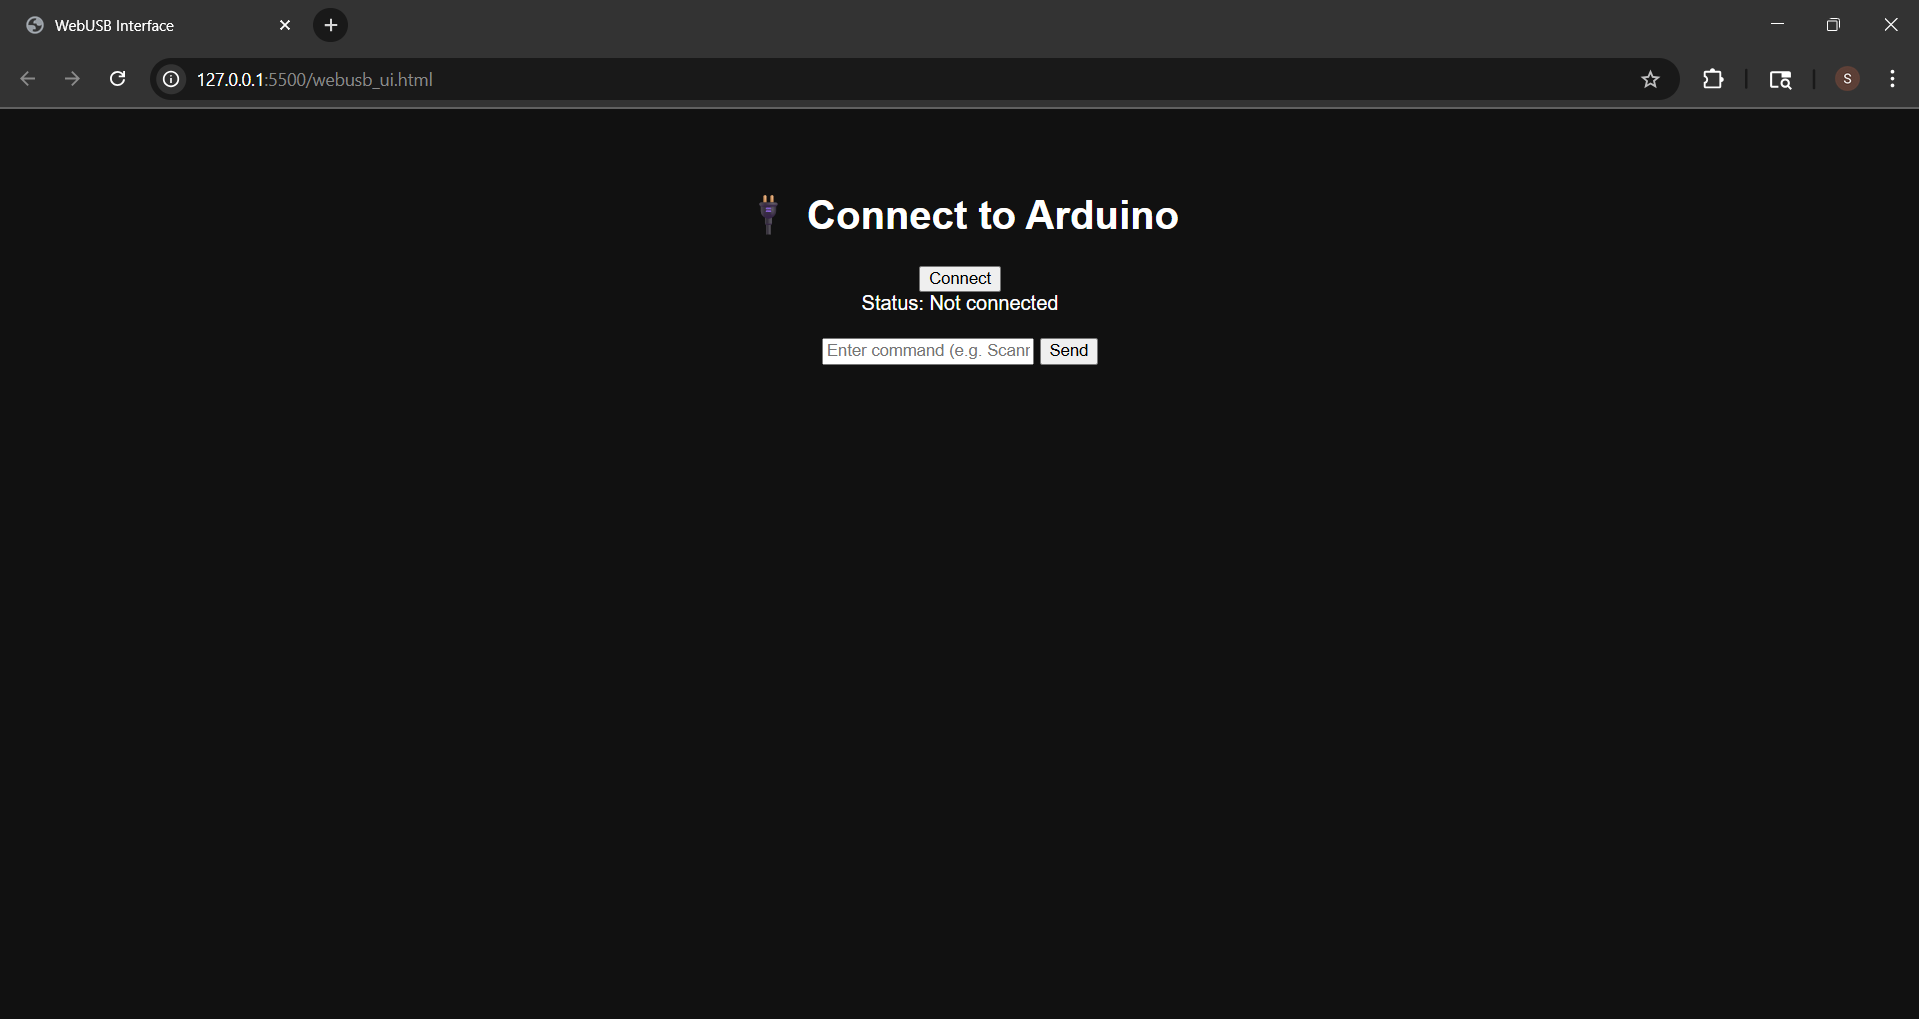
Version 0.1 → Set up basic web interface + Connect & Communicate with Arduino
HTML code below:
| V1.html |
|---|
| <!DOCTYPE html>
<html>
<head>
<title>WebUSB Interface</title>
</head>
<body style="background:#111;color:white;font-family:sans-serif;text-align:center;padding:2em">
<h1>🔌 Connect to Arduino</h1>
<button id="connect">Connect</button>
<div id="status">Status: Not connected</div>
<br><input id="command" placeholder="Enter command (e.g. Scanning Mode)" />
<button onclick="sendCommand()">Send</button>
<pre id="log"></pre>
<script>
let device;
const status = document.getElementById("status");
const log = document.getElementById("log");
document.getElementById("connect").onclick = async () => {
try {
device = await navigator.usb.requestDevice({ filters: [{ vendorId: 0x2341 }] }); // update with your vendor ID
await device.open();
await device.selectConfiguration(1);
await device.claimInterface(2); // use correct interface #
status.innerText = "Status: Connected";
readLoop();
} catch (err) {
status.innerText = "Status: Failed to connect";
log.innerText += err + "\n";
}
};
async function sendCommand() {
if (!device) return;
const cmd = document.getElementById("command").value + "\n";
const encoder = new TextEncoder();
await device.transferOut(4, encoder.encode(cmd)); // use correct endpoint
}
async function readLoop() {
while (device) {
const result = await device.transferIn(5, 64); // correct endpoint #
const decoder = new TextDecoder();
log.innerText += decoder.decode(result.data) + "\n";
}
}
</script>
</body>
</html>
|
Output Below:
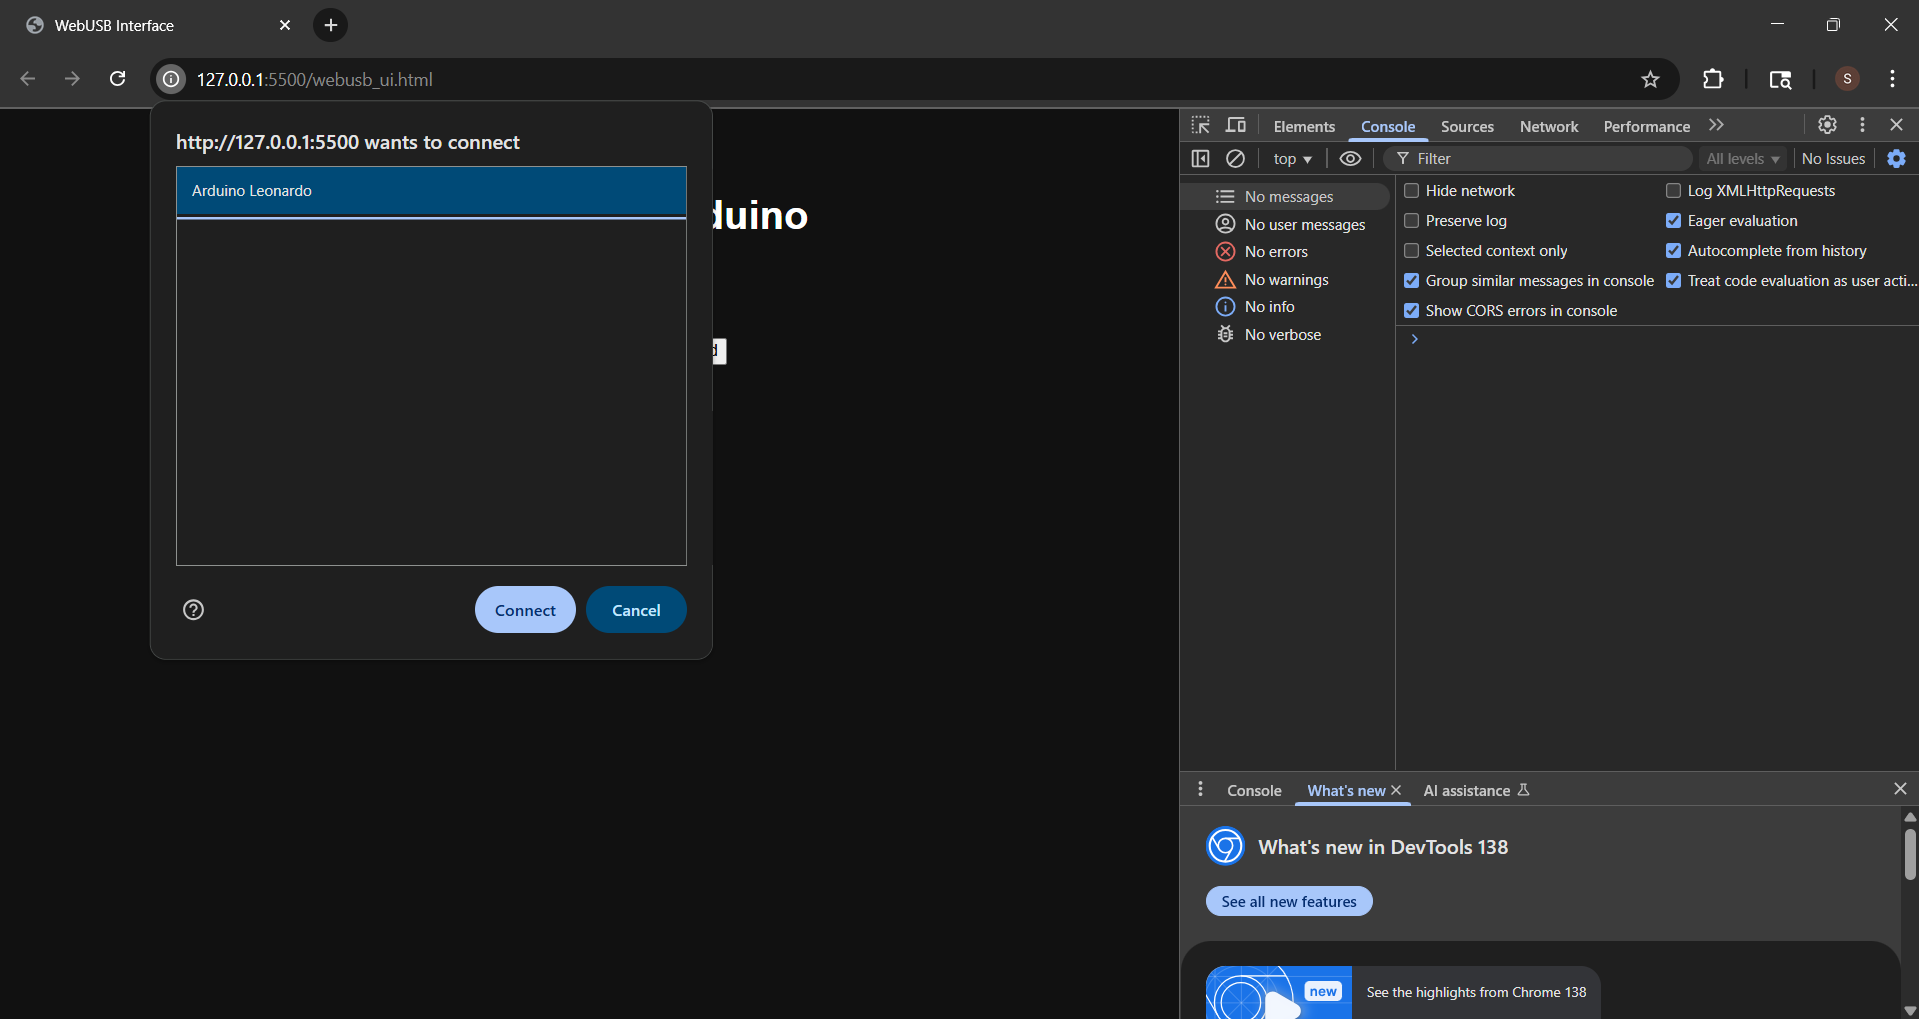
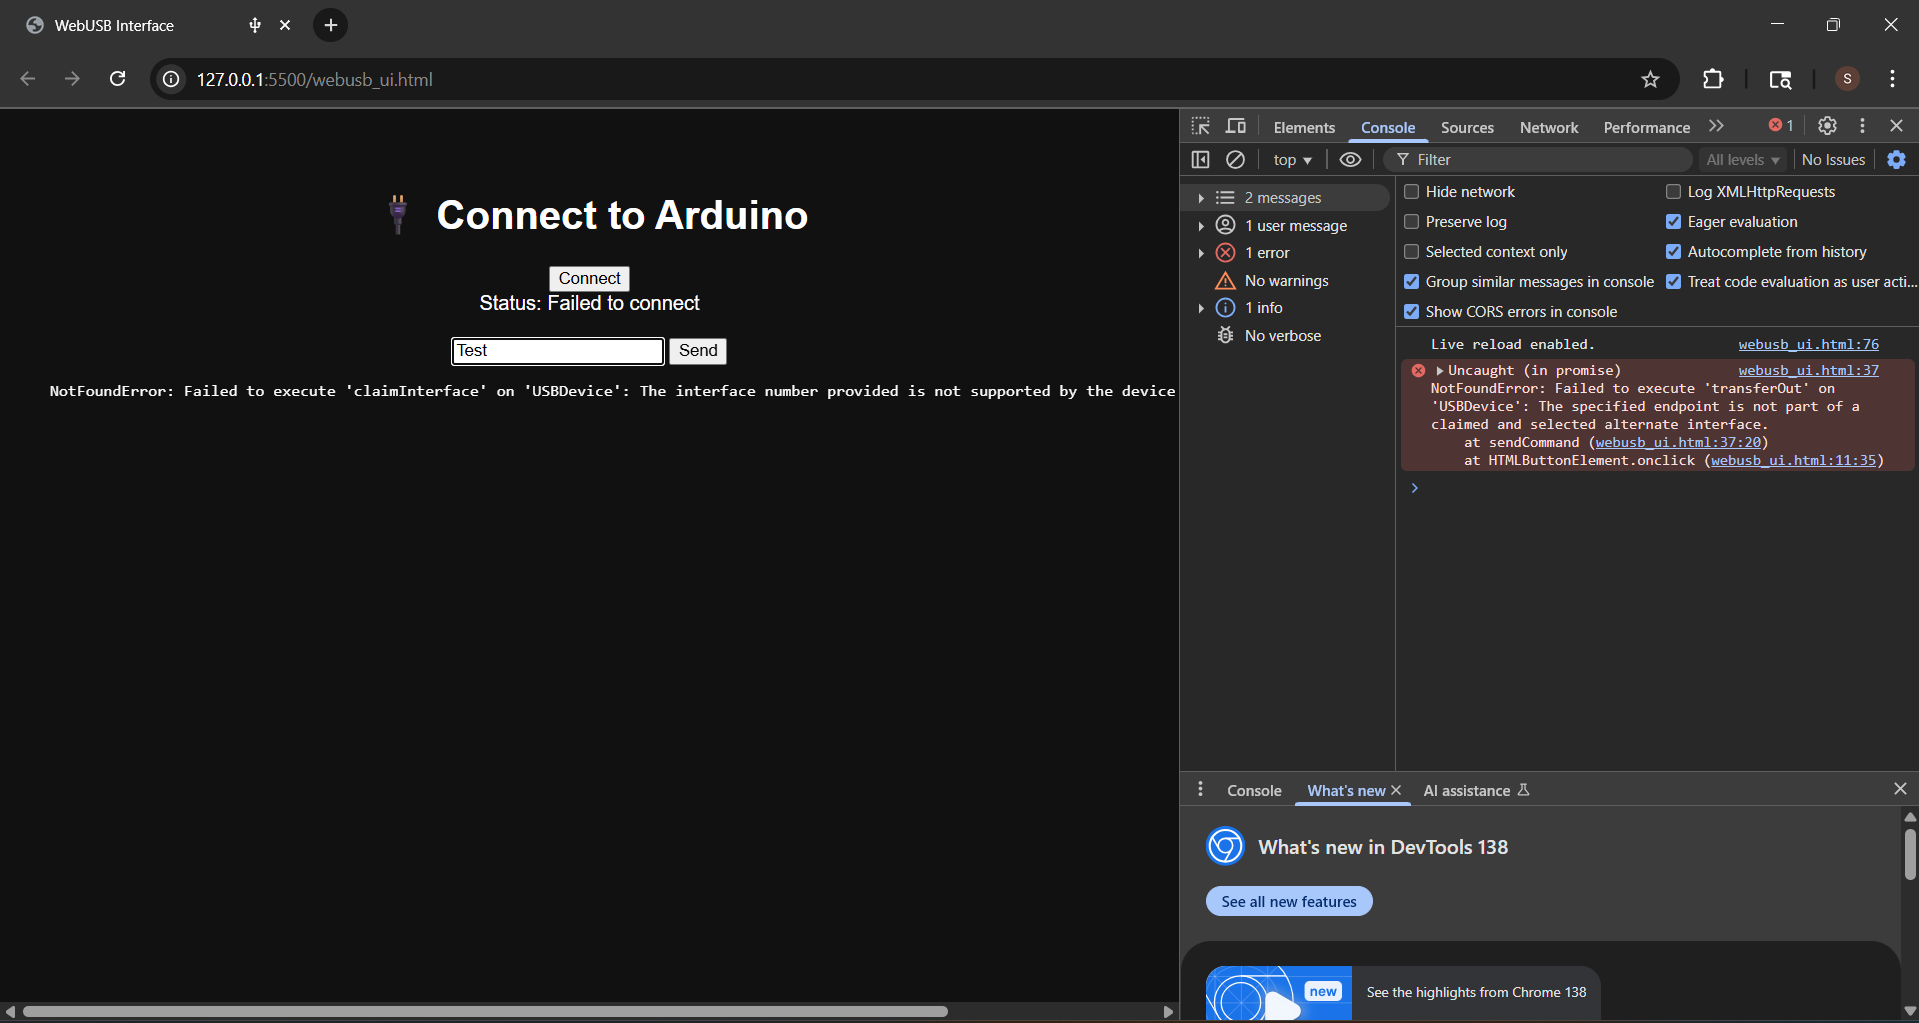
Ultimately, it didn't work out as well as expected, and all of it is most likely down to not having the Arduino set up properly to be able to recieve commands. It is able to recognize the Arduino, but the Arduino cannot recieve any of the messages that were sent.
Putting aside everything related to connectivity, there are issues with getting the webcam to work on a basic web interface on html. This could mainly be because of the potential for security risks, and so browsers will tend to block access to the webcam. To emphasize, this is my belief based on my findings and testing.
Version 0.2 → Build Webapp + Hope for webcam to work
For this version, I created a virtual coding environment within VSCode and attempted to use Flask to set up a basic web interface and get the webcam and Arduino to talk to one another.
Here is the python code:
| appv2.py |
|---|
| from flask import Flask, render_template, Response, request
import cv2
from datetime import datetime
import threading
import time
import numpy as np
from ultralytics import YOLO
import os
app = Flask(__name__)
# -------------------------
# Config
# -------------------------
CAMERA_INDEX = 0
LOG_FILE = "log.txt"
MODEL_PATH = "yolov8n.pt"
# -------------------------
# State
# -------------------------
cap = cv2.VideoCapture(CAMERA_INDEX)
model = YOLO(MODEL_PATH) if os.path.exists(MODEL_PATH) else None
current_mode = None
log_lock = threading.Lock()
detection_active = False
def log_message(message):
timestamp = datetime.now().strftime("[%H:%M:%S]")
line = f"{timestamp} {message}\n"
with log_lock:
with open(LOG_FILE, "a") as f:
f.write(line)
def gen_frames():
global detection_active
while True:
success, frame = cap.read()
if not success:
black_frame = (255 * np.zeros((480, 640, 3), dtype=np.uint8))
ret, buffer = cv2.imencode('.jpg', black_frame)
frame = buffer.tobytes()
yield (b'--frame\r\n'
b'Content-Type: image/jpeg\r\n\r\n' + frame + b'\r\n')
continue
if detection_active and model:
results = model(frame)[0]
frame = results.plot()
# Handle modes
for box in results.boxes:
cls_id = int(box.cls[0])
class_name = model.names[cls_id]
if current_mode == "scan":
log_message(f"MODE Scanning Detected: {class_name}")
elif current_mode == "sort":
log_message(f"MODE Sorting Detected: {class_name}")
break
ret, buffer = cv2.imencode('.jpg', frame)
frame = buffer.tobytes()
yield (b'--frame\r\n'
b'Content-Type: image/jpeg\r\n\r\n' + frame + b'\r\n')
@app.route("/upload_model", methods=["POST"])
def upload_model():
global model
file = request.files["model"]
if file and file.filename.endswith(".pt"):
path = os.path.join("models", file.filename)
file.save(path)
model = YOLO(path)
log(f"✅ Model loaded: {file.filename}")
return "✅ Model loaded successfully"
return "❌ Invalid model file"
@app.route('/')
def index():
return render_template('index.html')
@app.route('/video_feed')
def video_feed():
return Response(gen_frames(), mimetype='multipart/x-mixed-replace; boundary=frame')
mode = "stop"
@app.route('/set_mode/<new_mode>')
def set_mode(new_mode):
global mode
mode = new_mode
return f"Mode set to {new_mode}"
log_data = []
@app.route('/log')
def get_log():
return "\n".join(log_data[-50:]) # Keep only recent 50 lines
def log(message):
timestamp = datetime.now().strftime("%H:%M:%S")
log_data.append(f"[{timestamp}] {message}")
if __name__ == '__main__':
log_message("Flask Backend Started")
app.run(host='0.0.0.0', port=5000, debug=True)
|
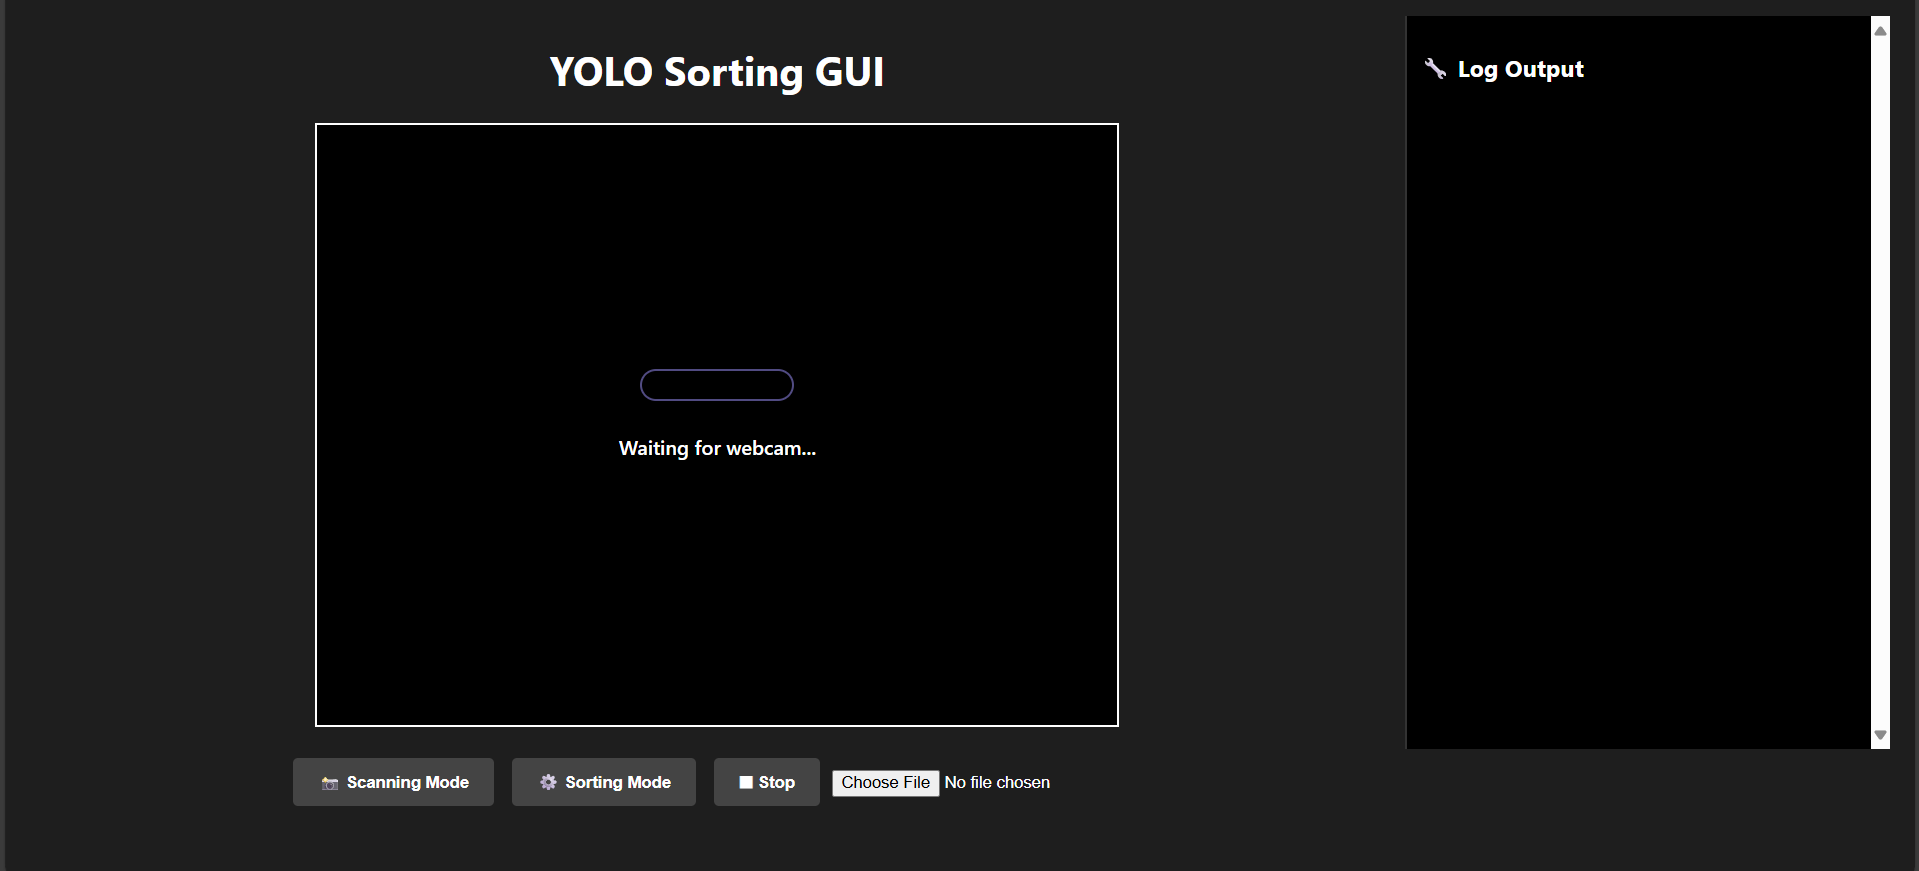
Turns out the webcam doesn't really work here either...
At this point, I have tried working with it and it ultimately did not work. At this point in the project timeline, I had made the decision to abandon the idea of programming a web interface and focus more on iterating through software that works and runs locally. Web development can be explored as an option, but is something I would consider to be "out of scope" for the project, but can be mentioned as a future improvements.
Conclusion
WebUSB is not ideal (from a simplicity point of view) due to the communication protocol that needs to be put in place. With any webpage, a client and server is needed. However, this communication would have to be extended to the Arduino as well. With a large amount of communication happening between the user, client, server, and Arduino, there is bound to be a loss of data somewhere due to data being sent and recieved from multiple sources, essentially overloading the system. While the ideal scenario would be to run something like this, my prototype will not be using a web-based system to reduce the complexity of communicating information.
Click to go back to architecture page.