Training Models
Overview
There are 2 general ways to go about training models for this kind of project. Before going into those ways, I will briefly explain the general workflow for what is required to train a computer vision model, such as a YOLO model. Note that I will do most of my training and models on YOLOv8, as that has abundant documentation and datasets online.
First, a foundational model is required to begin training. A foundational model refers to a pretrained checkpoint (on COCO or similar datasets) that is fine-tuned using your custom dataset. Below is the list of foundational models for YOLOv8:
- YOLOv8n (nano): Smallest and most lightweight model, and designed for use in devices where computational resources are limited.
- YOLOv8s (small): A good balance between speed and accuracy for most applications, and suitable for general inference tasks on CPUs and GPUs.
- YOLOv8m (medium): Mid-tier model with more extensive network architecture, allowing for higher precision. Suitable for applications that require more precision.
- YOLOv8l (large): Designed for applications where high precision is important, with the ability to extract complex features from high-resolution images.
- YOLOv8x (extra large): Largest and most powerful model, and useful for situations that require the highest accuracy where precision is critical. However, it does require high-end GPUs for efficient operation.
It is important to note that it is not advisable to go for the largest model every time because of something known as overfitting. Basically, the model gets very good at picking up complex details such as noise, blur, etc that it performs exceptionally well on the validation and test set, but does not work the best when it comes to the real-world application, especially if the deployment condition has the potential to change. The best analogy for this would be a student that studies for an exam by memorizing practice exam questions and their answers, but doesn't perform as well on the actual exam. In this scenario, the model would memorize information rather than figure out patterns in the objects.
However, it is important to consider that the datasets or custom dataset used MUST be somewhat relevant to what is being sorted. This is especially true for many complex objects that have some important details that have to be captured.
Criteria for Selecting a Good Baseline Model A good baseline selection process considers project requirements and available resources:
- Hardware Availability:
- Limited Resources (CPU only, edge device, low VRAM GPU): Start with YOLOv8n (nano) or YOLOv8s (small). These are designed for efficiency on constrained hardware.
- High-End Resources (powerful GPU server): Start with YOLOv8m (medium) or YOLOv8l (large) to aim for maximum accuracy.
- Performance Requirements:
- Real-time applications (high FPS is essential): Prioritize 'n' or 's' models.
- High accuracy is paramount (medical imaging, security): Prioritize 'l' or 'x' models, as speed is less critical than precision.
- Dataset Characteristics:
- Small or less varied datasets: A smaller model ('s' or 'm') might be less prone to overfitting and can be a better starting point.
- Large and diverse datasets: Larger models can better leverage the extensive data to learn complex patterns and achieve higher accuracy.
A good general baseline is to start with the YOLOv8s or YOLOv8m model. This provides a solid balance of speed and accuracy, and from there, you can scale up to a larger model (if more accuracy is needed and resources allow) or scale down to a smaller one (if faster inference or less VRAM is required) after observing the initial performance on your specific data.
Alongside selecting a foundational model, a set of annotated images must be prepared. Depending on the complexity of the classes of objects being sorted, anywhere from 30-100 images per class should be chosen. Once a foundational model is selected and images are either selected or taken, then the dataset being used has to be split into train, validation, and test categories. The train category is where the foundational model will take the images and the annotations and try to learn more about each object type and recognize patterns. The validation category will be used by the model to see if it is doing a good job at detecting objects, almost like a mock exam, where the model will take a guess and then see what the answer is. The test category will be used by the model as a final exam to evaluate the model performance.
As mentioned before here are the two ways to go about training a model:
- Start by finding a dataset on a website like Roboflow that has preannotated images, and an adequate amount of images per unique class of object in the dataset. It may also be valuable to combine a few datasets together or supplement the dataset with your own images. From there, a model can be trained.
- If there are little to no datasets online, start by taking pictures of the objects that need to be sorted and from there, use a website like Roboflow to help annotate the images. Augmentations should also be applied so that the model can handle cases like a blurry feed or a rotated camera. From there, a model can be trained.
YOLOv8 models can be trained for object detection (.pt), segmentation (-seg.pt), or classification (-cls.pt). For object sorting tasks like this one, we use the detection model type.
YOLOv8 expects a data.yaml file in the dataset root that defines paths for train/val/test and the class names:
train: ./train/images
val: ./valid/images
test: ./test/images
nc: 5
names: ['coin', 'washer', 'bolt', 'nut', 'other']
Below is a sample training command (I will go more in depth later):
This command initializes the YOLOv8s model, uses the specified dataset, and trains for 50 epochs at 640×640 resolution.Code (Jupyter Notebook)
Note, the following code cells was made to import image data from Roboflow, which would work for either of the two pathways mentioned before. It is possible to run this locally, but I used Google Colab to run this so I can connect to a GPU (which will greatly speed up the process).
This is the EXACT code I ran to get the model that I used for my testing. View the Google Colab
Workflow
While it may be tempting to pull a model from online or to use a dataset that from online, it is best to train the model. I personally found more success with training my own models than I did with using datasets from online. This can be due to the fact that the camera I have elected to use is not very high resolution, so a model will have to be trained off of that.
However, the biggest reason that it makes sense is because the environment with which the prototype exists in NEVER changes. The same camera, backdrop, and lighting conditions are being used no matter the object type, so it makes sense to train in that environment.
Here's a quick guide on how to train the model:
- Upload the electronics tester code onto the Arduino.
- Grab a subset of objects that require training, and ensure that there is a variety of objects and that all classes of objects are included.
- Record a video using the external webcam used for sorting and manually enter commands into the Serial Monitor to move the servo to simulate object sorting. This is for video purposes only, so no need to be concerned with where the objects go. Make sure the video is adequately long and features a variety of objects. Also, ensure lighting is optimal.
- Create a new project on Roboflow and select Object Detection. You may have to specify the classes of objects being used. Note that I extracted 1 frame every 0.25 seconds.
- Allow Roboflow to create bounding boxes on the video using prompts that you give it. I went with Grounding DINO, but any other type of segmentation model can be used to create the bounding boxes. You may have to manually enter the values in.
- Apply augmentations on the dataset. Augmentations are changes to the images captured that may occur during deployment. Common examples include: rotation, flip horizontally, flip vertically, noise, blur, etc.
- Allow Roboflow to apply augmentations and ensure a good train/val/test split. Most of the images should be training to ensure that the model has enough examples to train off of.
- Now, download the dataset from Roboflow, and select the code snippet option. Copy the code.
- Open up the Google Colab used to train the model and paste the relevant information to the appropriate cell.
- Train model by going through Google Colab and make sure that the model gets downloaded to a safe place.
- Model should now be ready for deployment.
What not to do: It is not really useful from my testing to take pictures with a phone and then manually go through and label images. While that was great for the model statistics, it had no representation of the actual operating environment. This was especially true because the hardware that was used was subpar at best, and it was best to train everything as close to the operating environment as possible.
Sample Model Information / Statistics
I ended up choosing US Coins to test the object sorter on. This is down to a few reasons. First, it is something that can be abundantly found, so it is is relatively easy to get a hold of an adequate number to sort through. Second, coins are relatively complex to detect, especially the intricate differences between dimes, quarters, and nickels. If I can get coins to work, even moderately successfully, then it can serve as a great proof of concept to apply towards other sorting situations.
Below are some pieces of information of the model I used during testing:
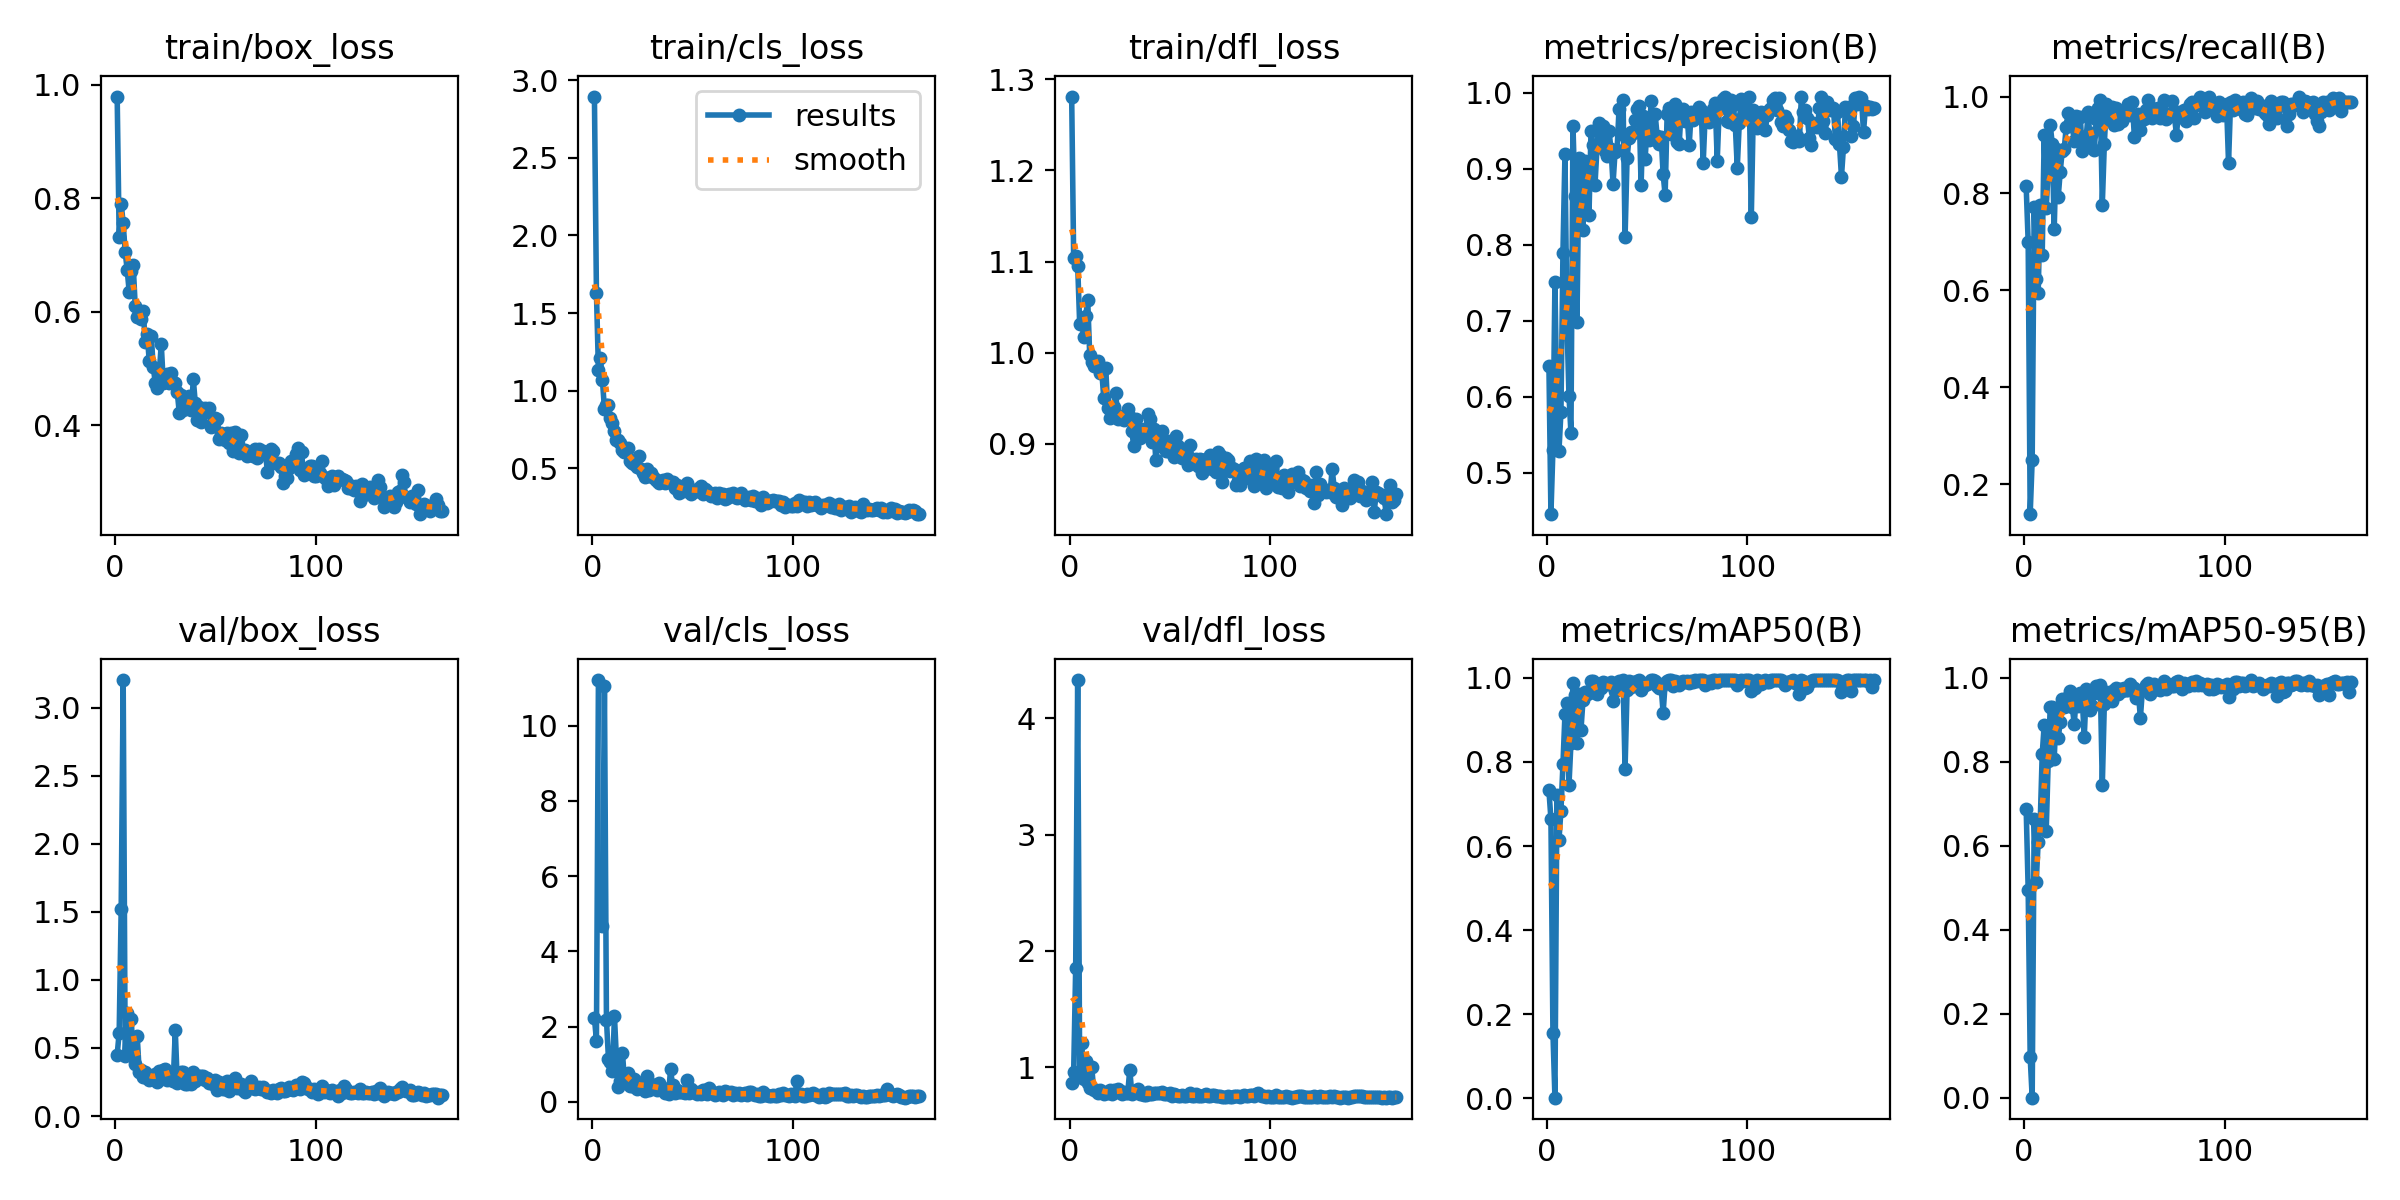
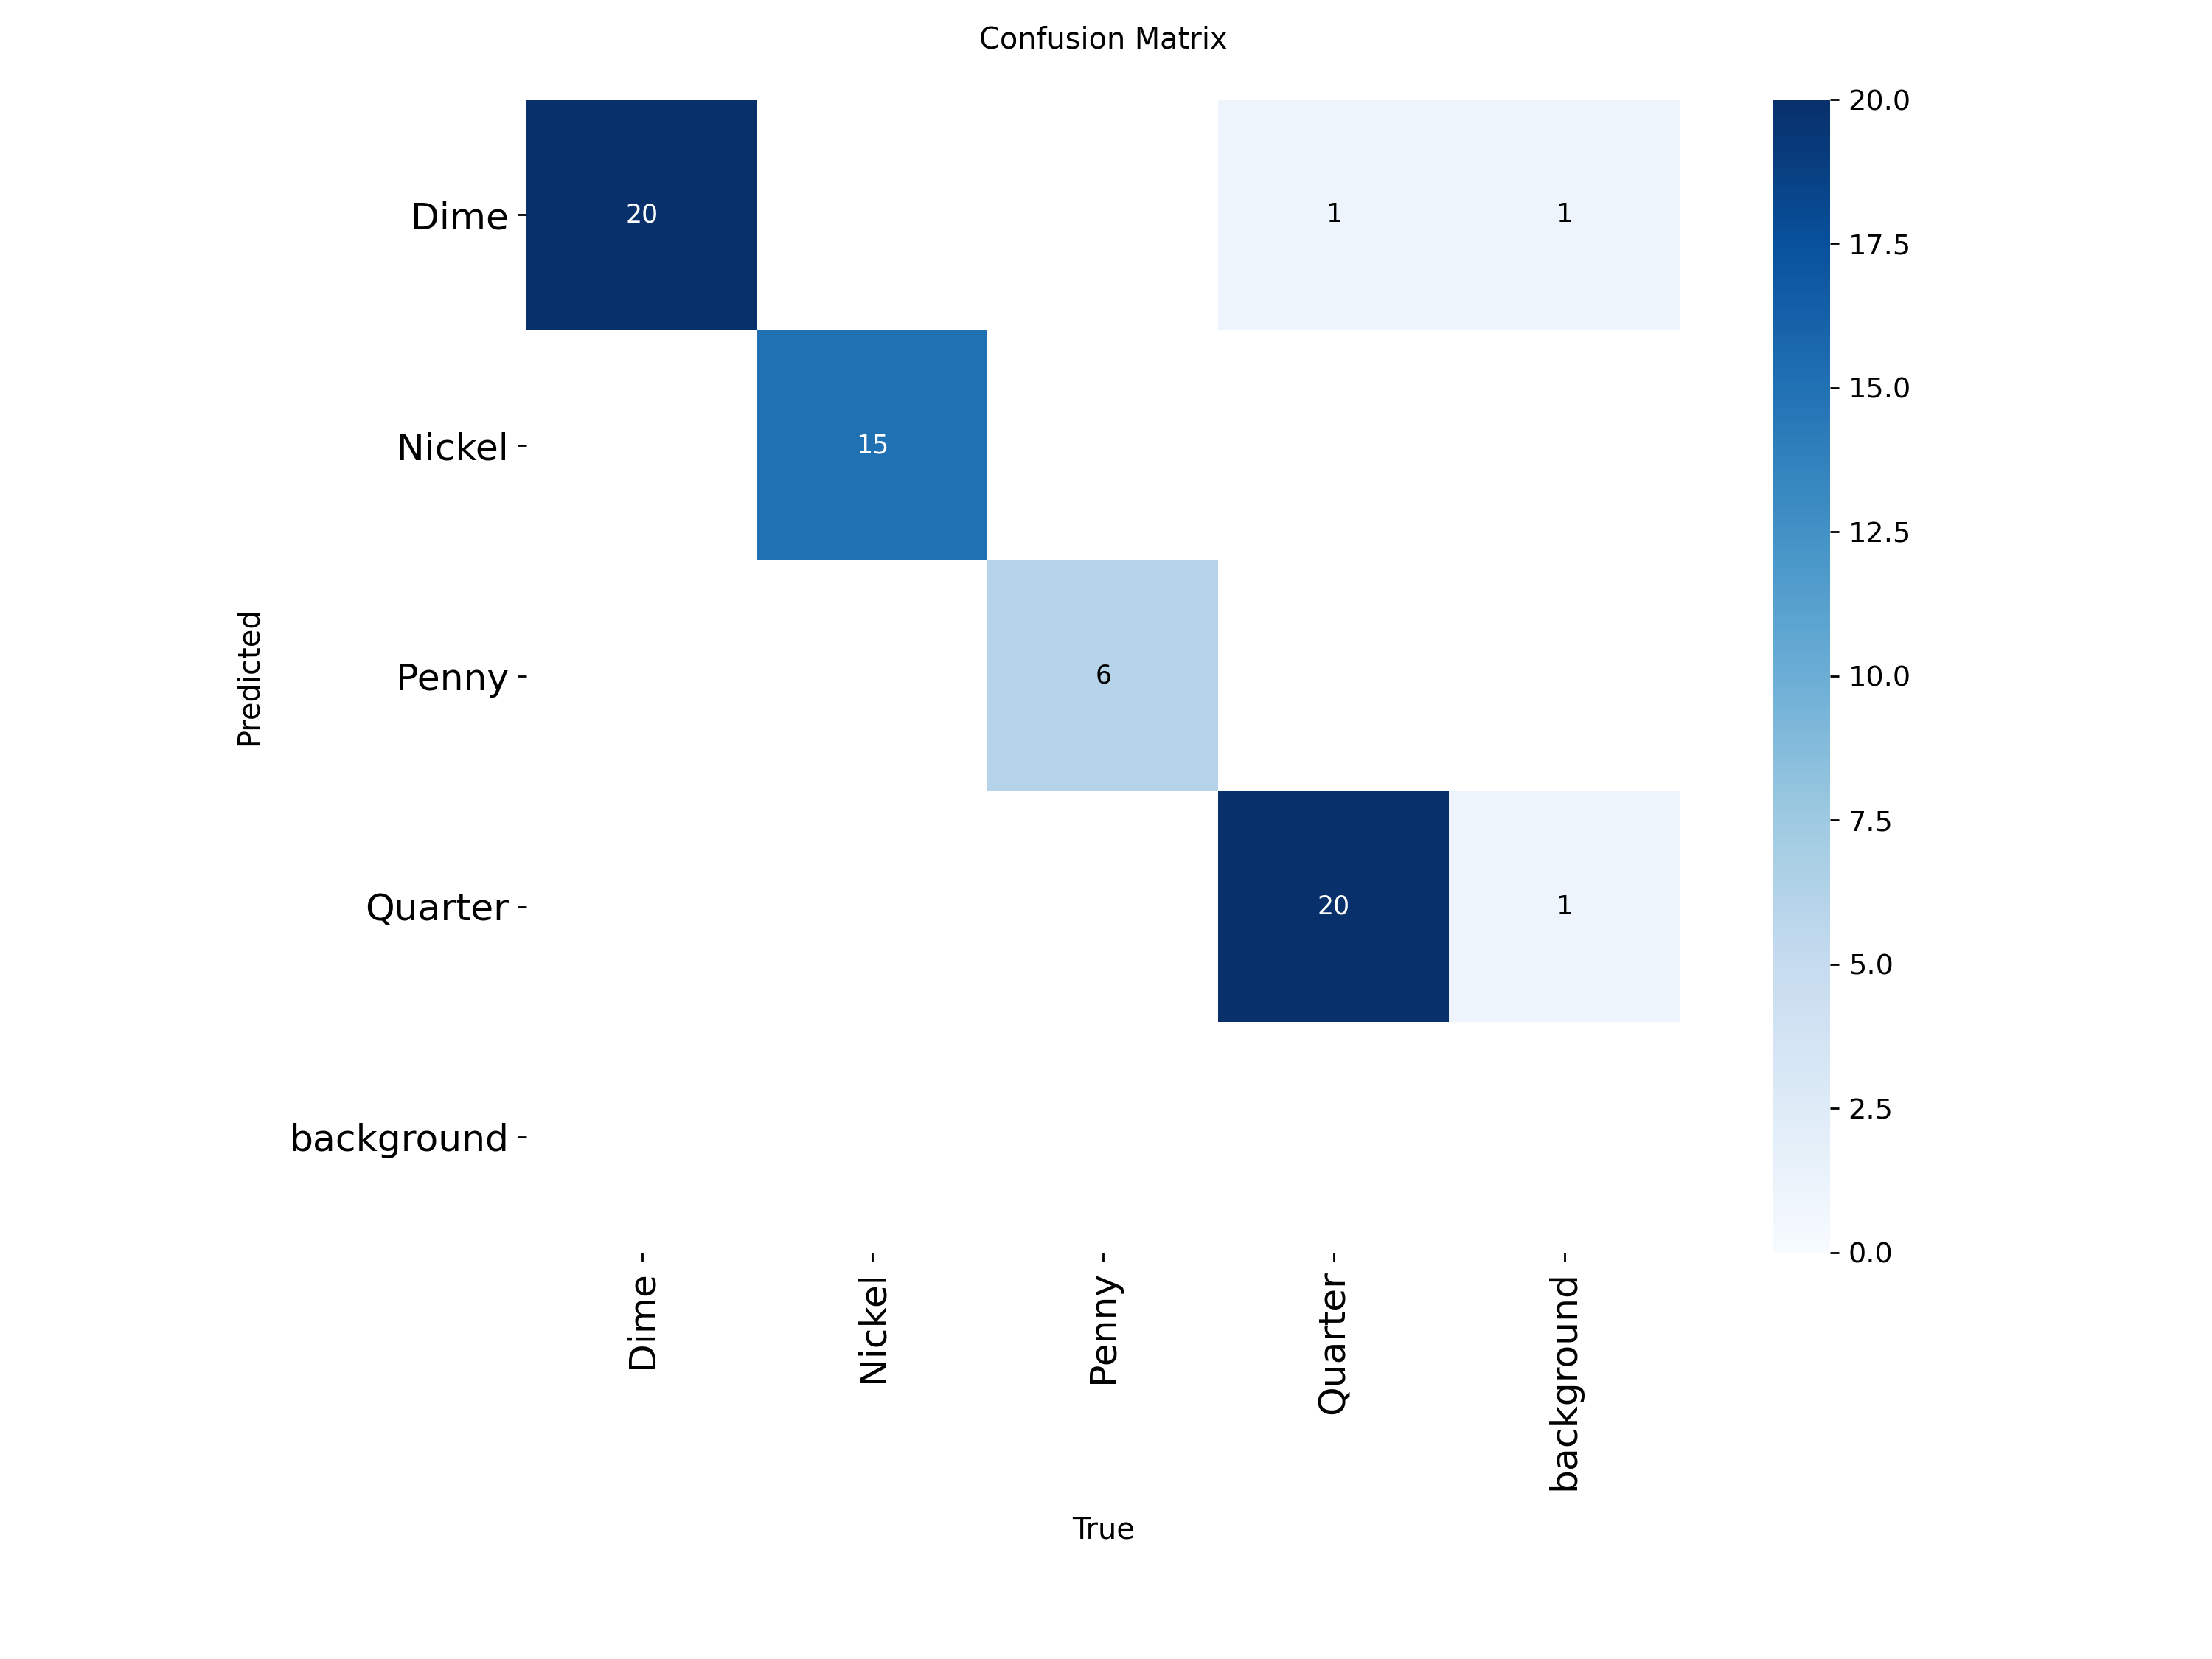

Note: this model is not optimal. There could have been a LOT more data points used (i.e. more objects). I recorded a video that was around 2-3 minutes long, and I should have maybe done 6-7 minutes. This would have given more data to work with and will greatly reduce any misdetections that were seen (as shown throughout the testing).